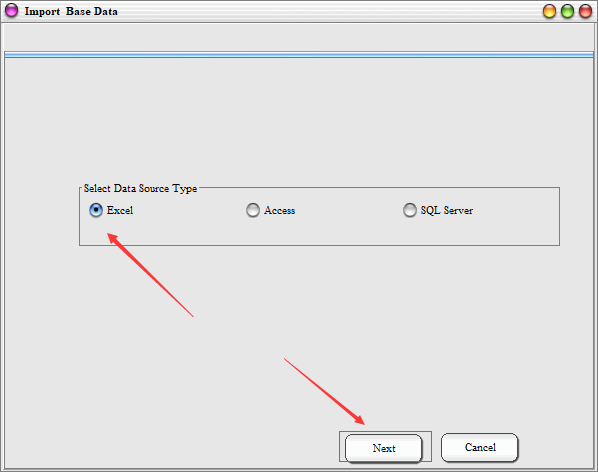
1.Login software #
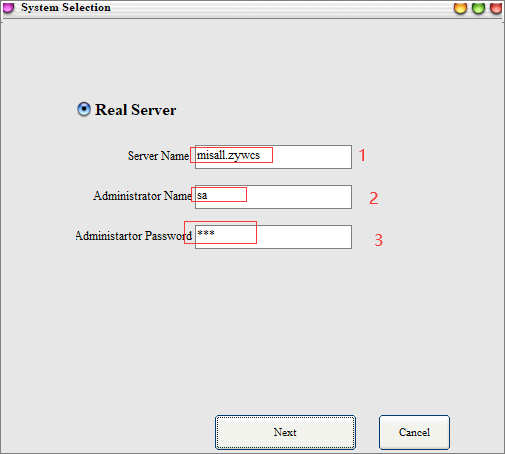
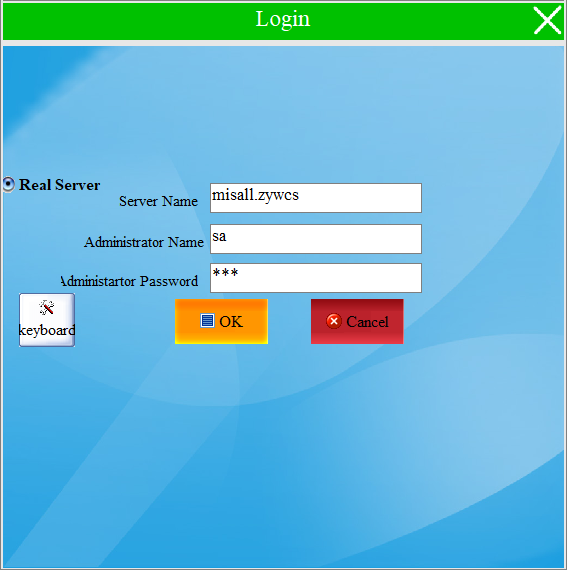
Login software we need to connect to the server for login configuration, double-click to open the software we can directly enter the corresponding server name, administrator account and password, when you’re done, just click next. (note: server domain name without spaces, admin name default: sa)
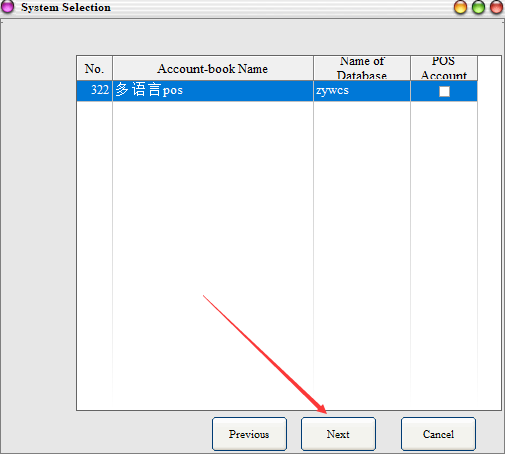
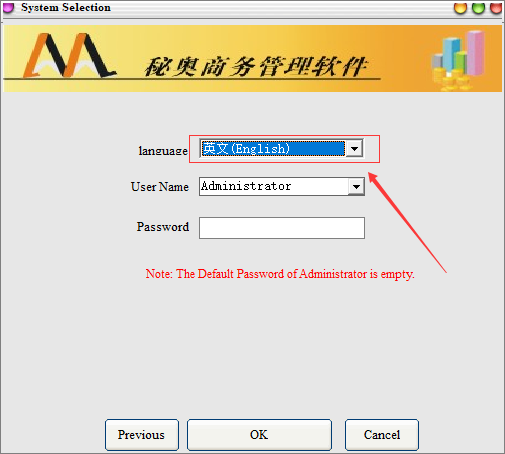
After the next step will be directly out of the set of account name, to confirm the set of account name and their registration name is consistent, then click the next step to login. Then click on the next step will be entered into the login system interface, you can select the language you need, select the corresponding user to enter the password after login (note: System Administrator account is empty before the default is not set)

2. Import commodity data in bulk #
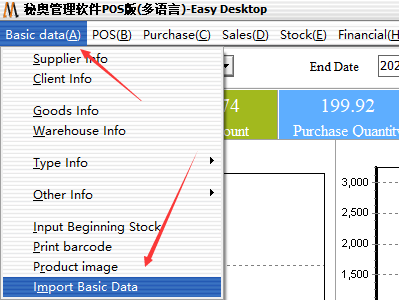
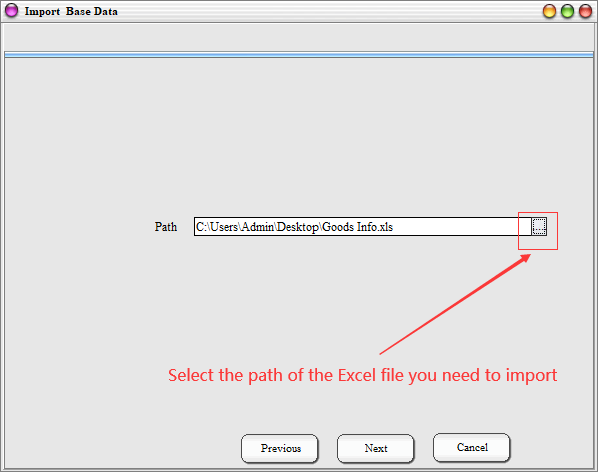
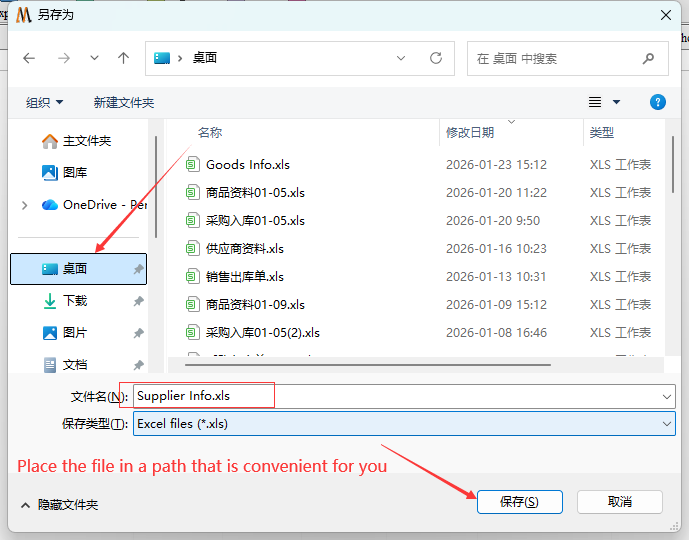
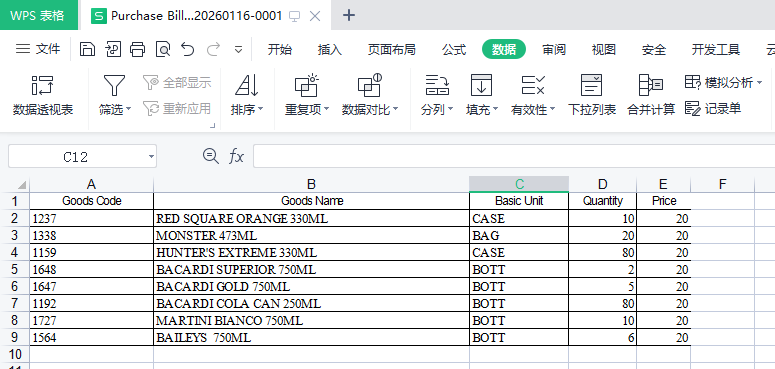
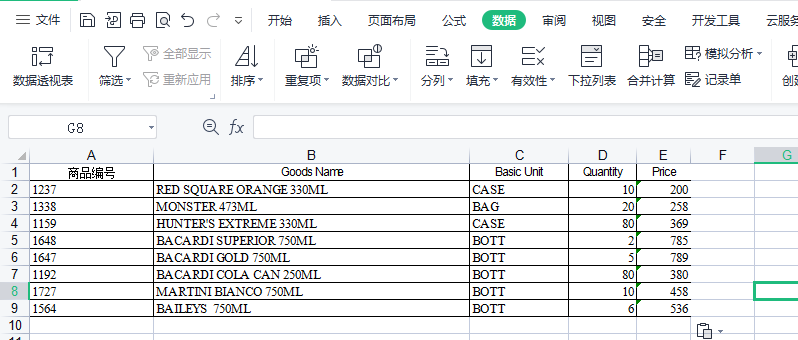
First Step: to import the basic information of goods, first need to organize Excel table, EXECL table must be suffix is. XLS file format, import EXECL table can not be open, be sure to close the file before importing.
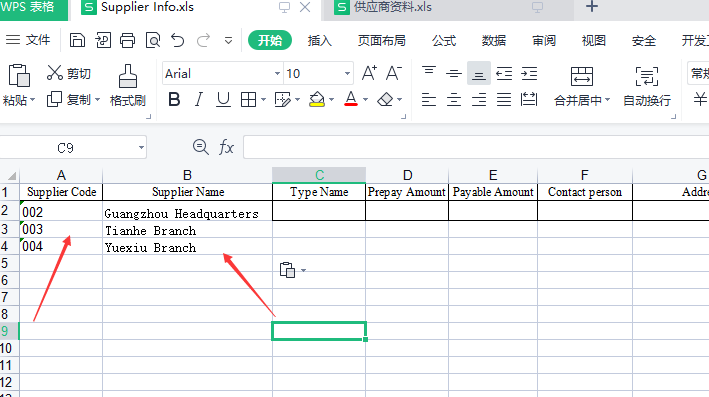
(note: On the EXECL form for importing basic information, the columns of commodity number and commodity name are required.)
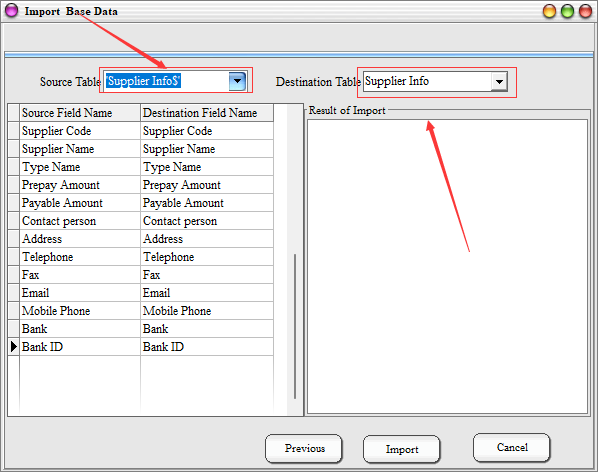
Form template
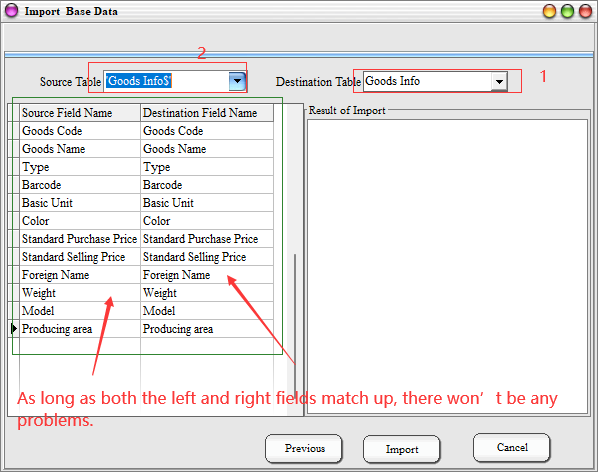
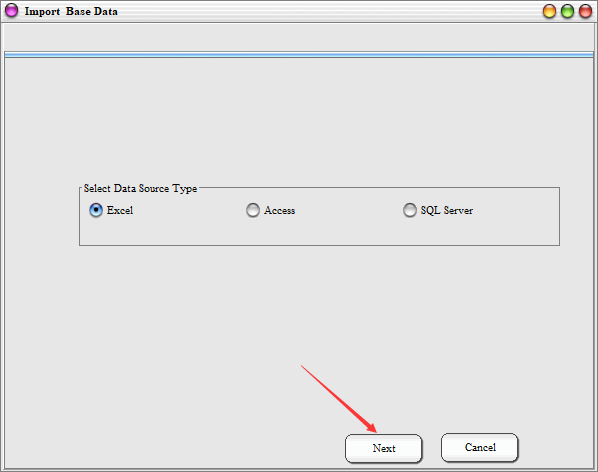
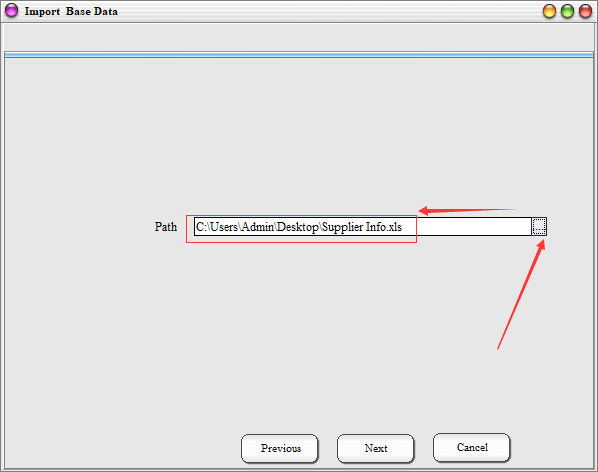
Operation Mode: Basic data(A) →Import Basic Data → Select Excel Table → Select Excel file path → select the destination source data table (right)→ select the source data table (left)→ start to import → Import completed
3. Batch import of other data #
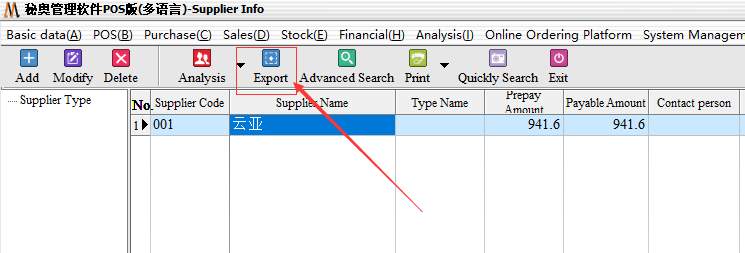
The first step: You Need to import the supplier information to the system directly after entering the supplier information-export-an Excel template, the corresponding fields fill in Excel form can, customer data, warehouse data, employee data and so on in turn. (note: the number and name can not be blank, other according to the needs to fill)
Step 2: Edit the information you want to import, Save the Excel File, and close the Excel table, open the software-basic data import → Select Excel → Select Excel file path → select the right side of the destination source data table (select the supplier information)→ select the source data table → start importing → Import is complete
4. Quick storage #
Operation Steps: purchasing management → purchasing warehousing list → export → edit Excel → import
If there is an incoming quantity then it is a direct purchase order. The EXECL file must also be suffixed with. XLS file format, EXECL table can not be opened at import close.
(note: Import form of warehouse receipt: the header must contain commodity number, commodity name, quantity and unit price. The unit price value can be filled in or not, and the price corresponding to the commodity information is called when not filled in.)
Remember to click on the new import documents, after the new selection of the corresponding warehouse and supplier directly after the click to import
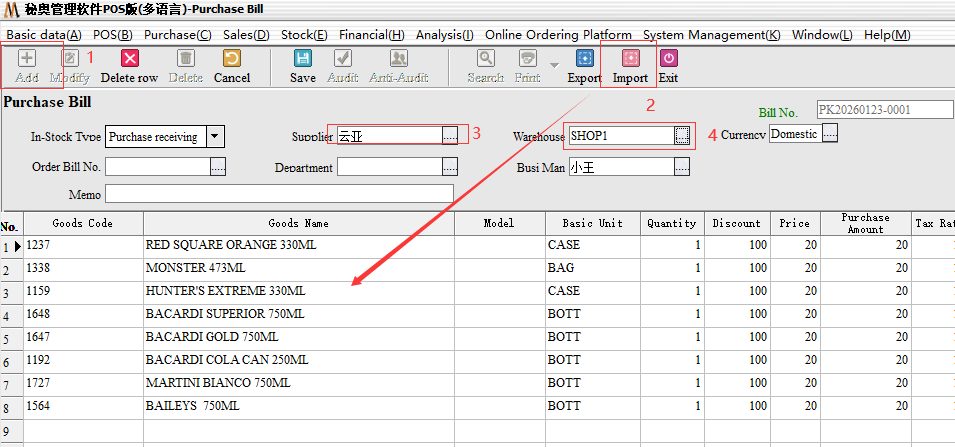
(note: 1. When importing, import in Chinese language. 2. If you can not recognize the import Excel file directory, you need to change the Excel file name to English or numbers.)
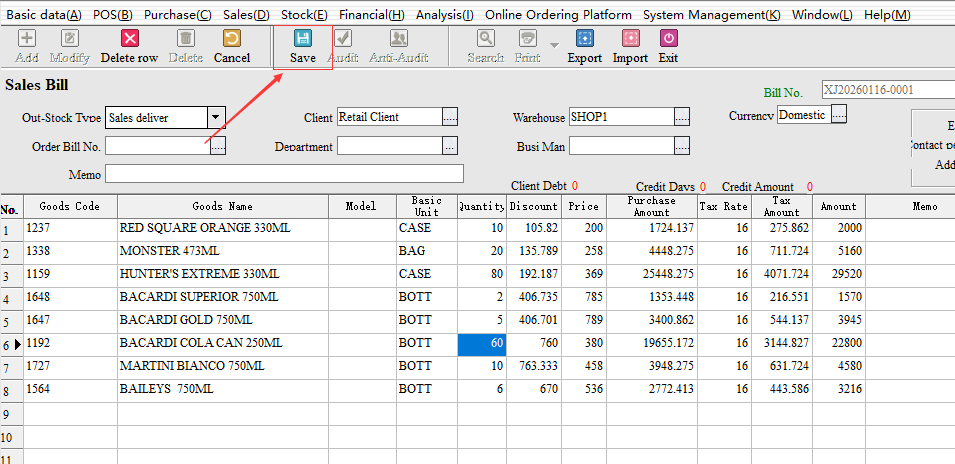
5. Quick export #
Steps: sales management → sales out of the warehouse list → export → edit Excel → import
The basic operation of the Excel table import and purchase warehousing consistent, the main difference is targeted to choose sales customers and out of the warehouse after the audit can be saved.

6. Take a quick inventory #
Steps: Warehouse Management → Inventory breakdown
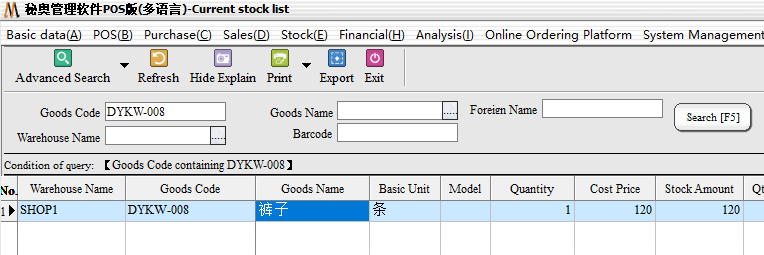
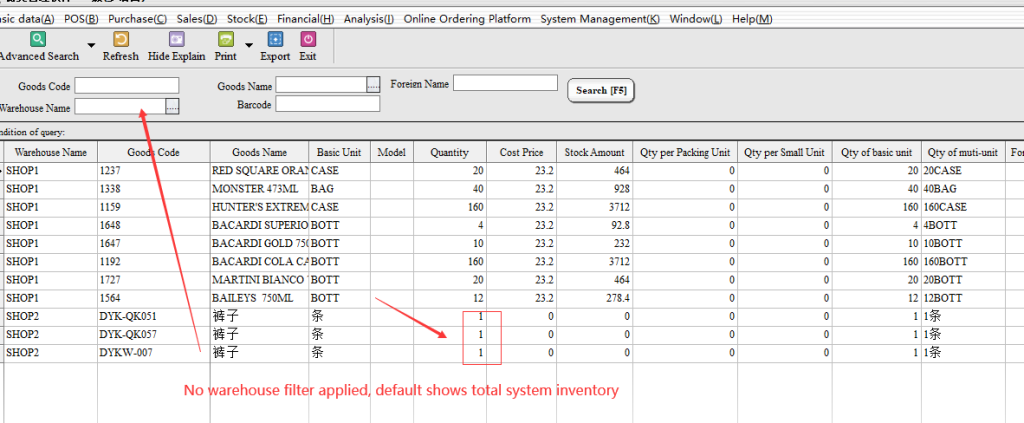
If you need to accurately check the current stock of a single item, enter the corresponding product number or name to query (if the selection of different warehouse corresponding warehouse, the default query the entire system inventory) example: need to query DYKW-008 inventory of goods, enter Dykw-008 in the item label column.
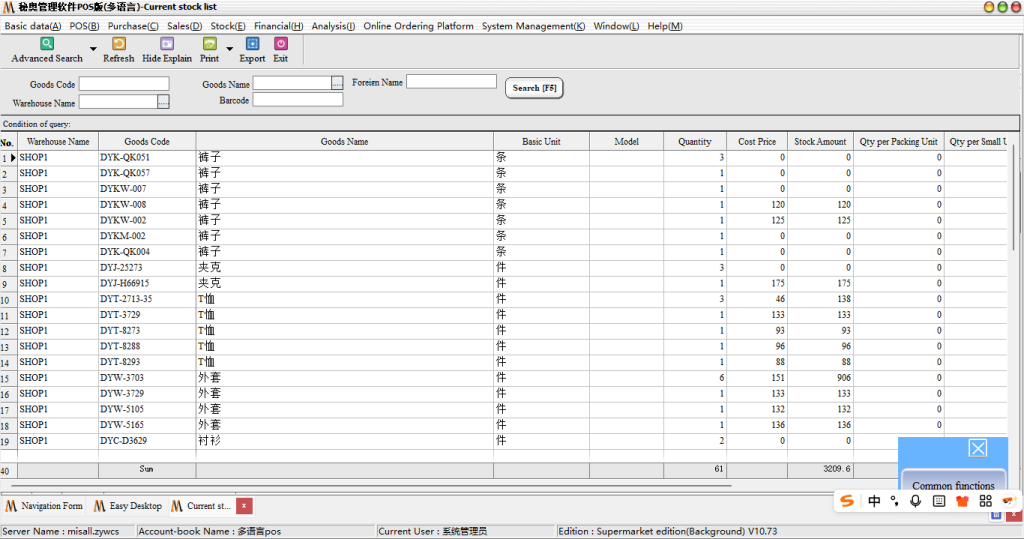
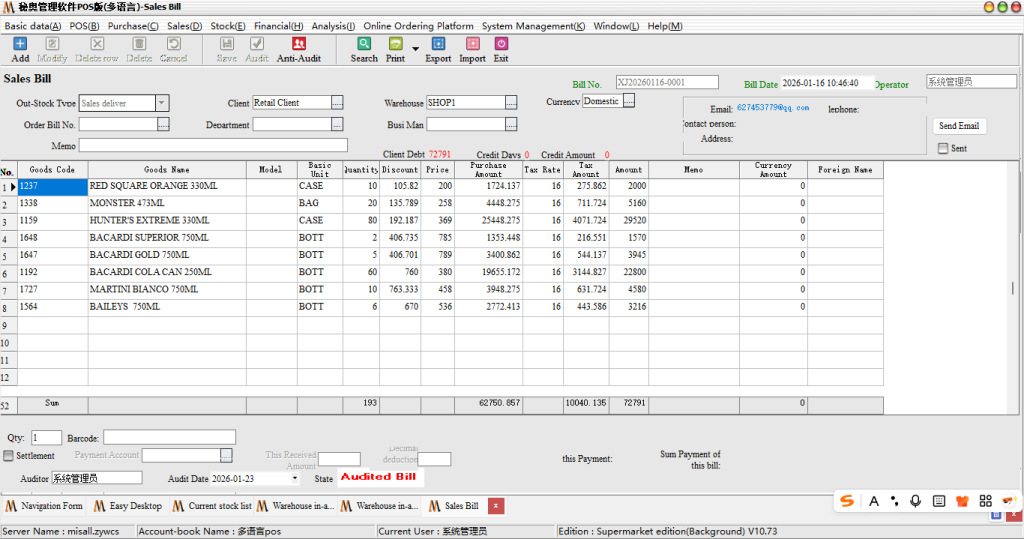
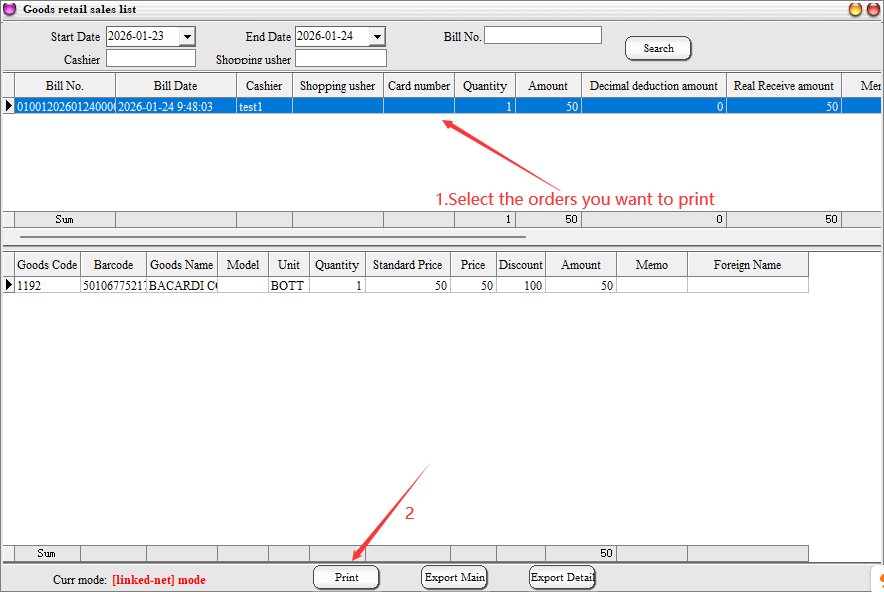
7. Quickly check the details of goods in and out of storage #
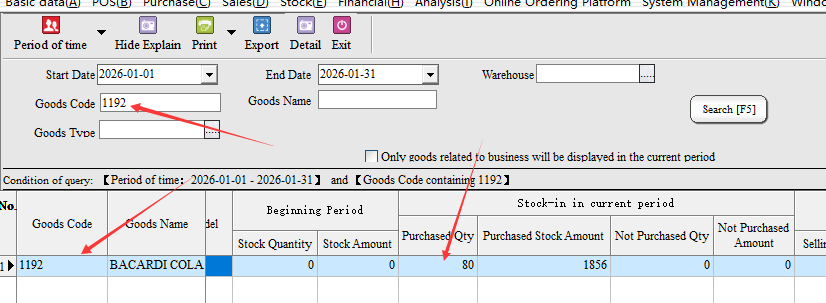
Operation Steps: report statistics → Warehouse Report statistics-in/out warehouse summary/out warehouse such as details (summary shows the total number, details show the number of specific documents; default query all)
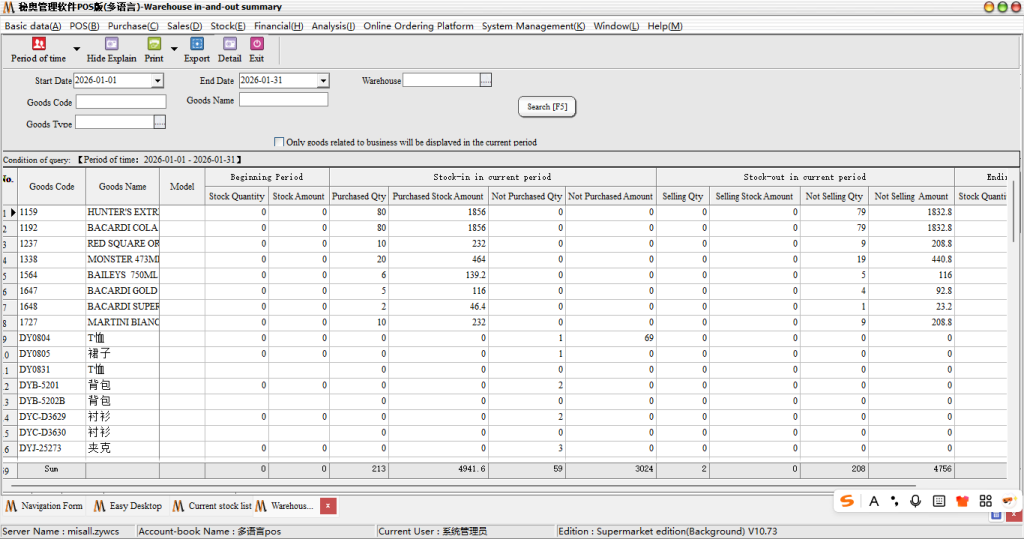
If you find the stock quantity error, you can according to the header at the beginning of the period, the number of this period, the number of three fields out of the warehouse to see which link is the problem
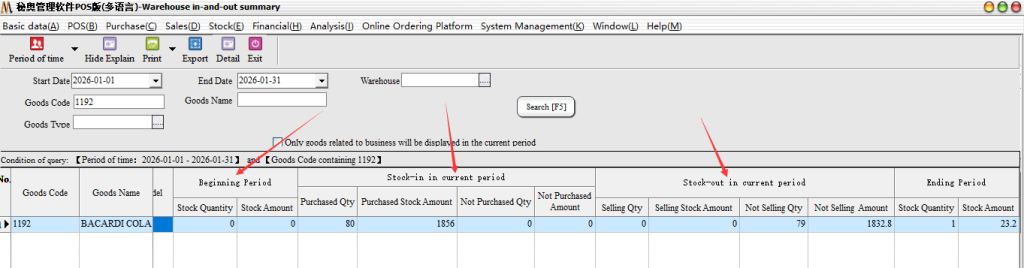
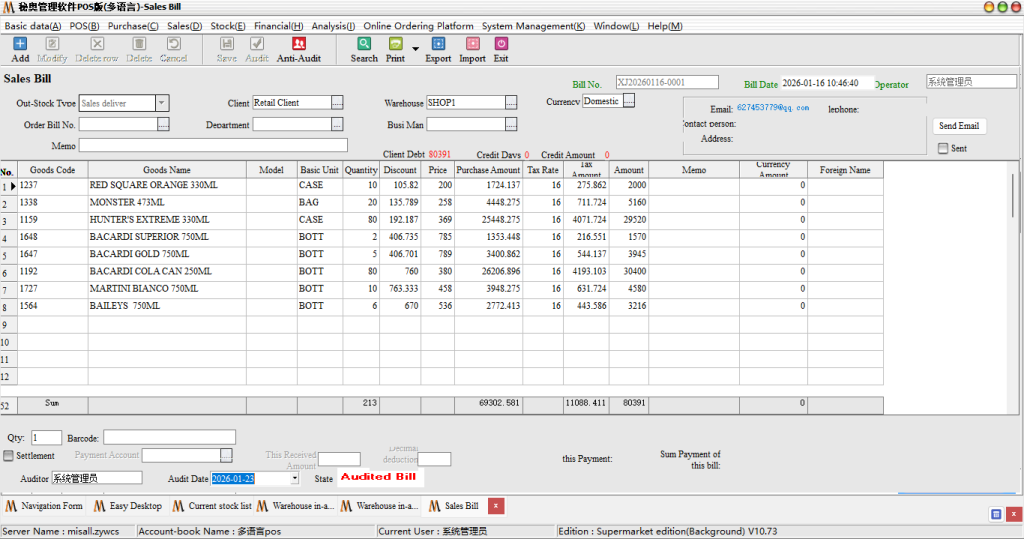
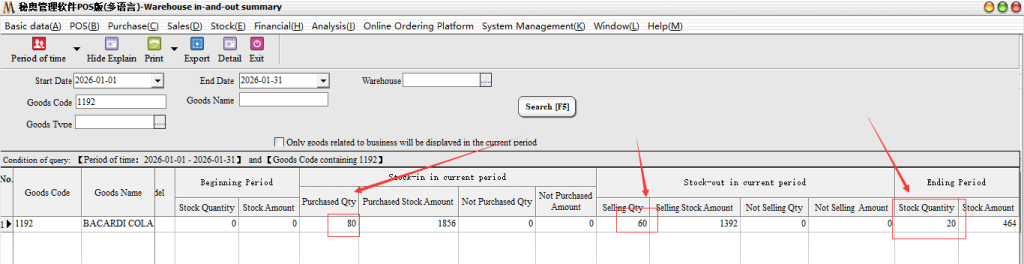
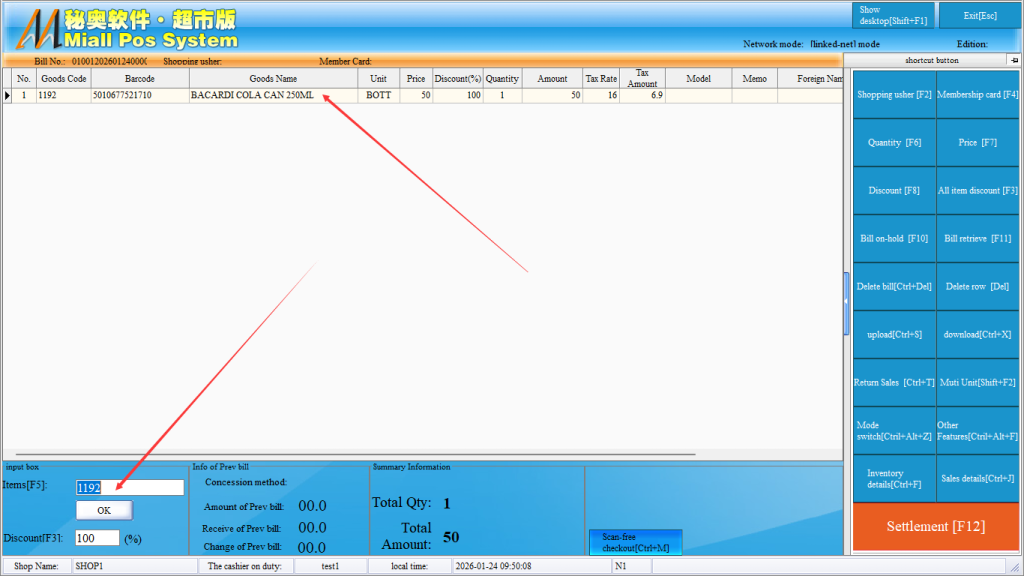
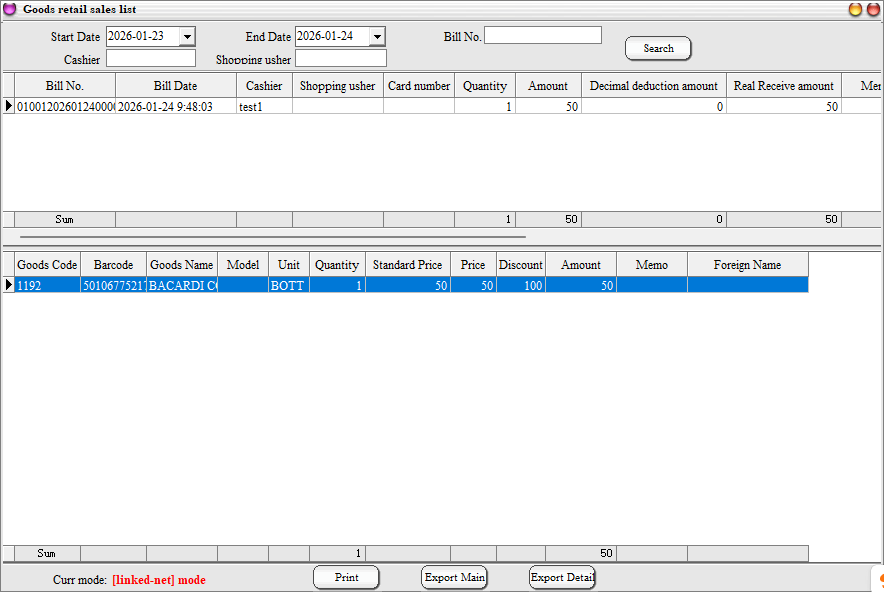
Assume that the product number 1192 product problems, you can directly select any one of the goods double-click, bring up the list.
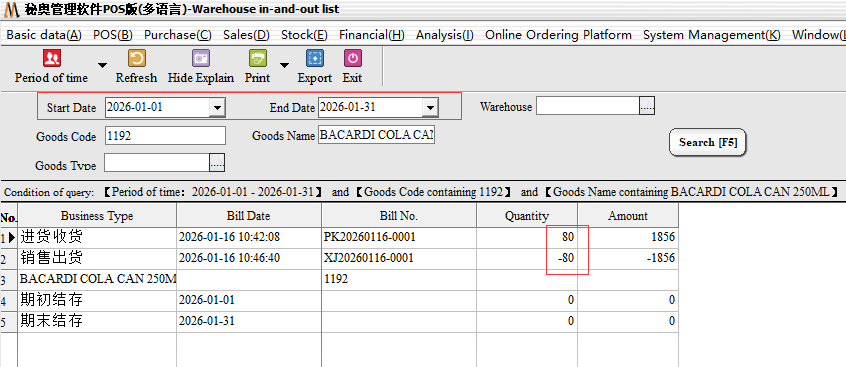
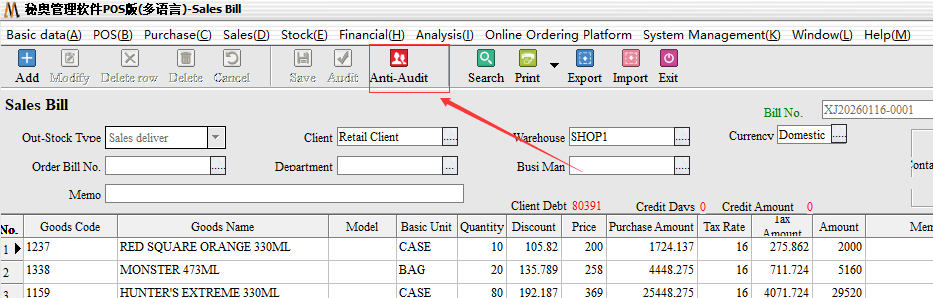
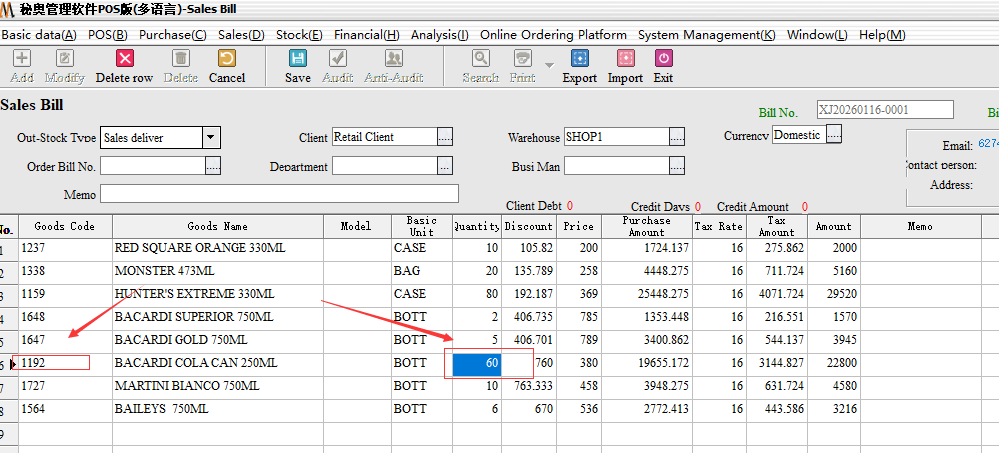
After bringing out the specific documents of the goods, it can be found that in 2026-01-01-2026-01-31, the goods have only been purchased and sold in and out of the warehouse during this time period. Assuming that the purchase quantity is correct, but the sales quantity is on the high side (the actual sales is 60) , then double-click the document number directly in this report to bring up the specific documents.
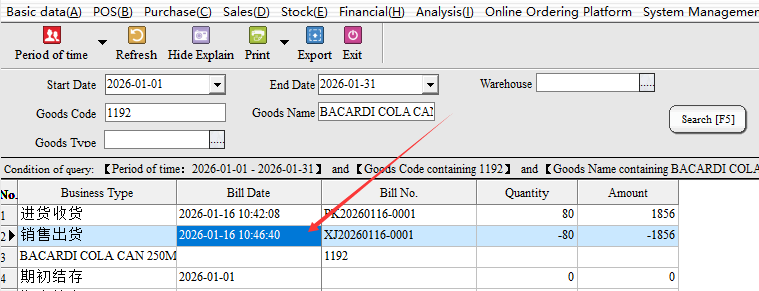
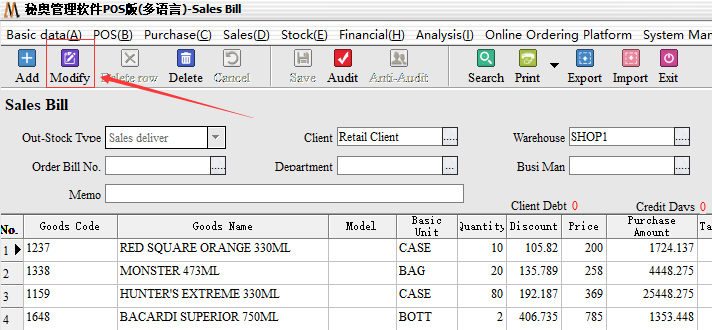
After entering, you can find that the documents have been audited. If you need to modify them, you need to first-counter-audit-then click-modify, the need to modify the quantity of goods to adjust the number of required out of the warehouse after-save-audit-you can.

Come after re-query 1192 inventory, you can find the original 0 inventory, inventory into the number of 20.
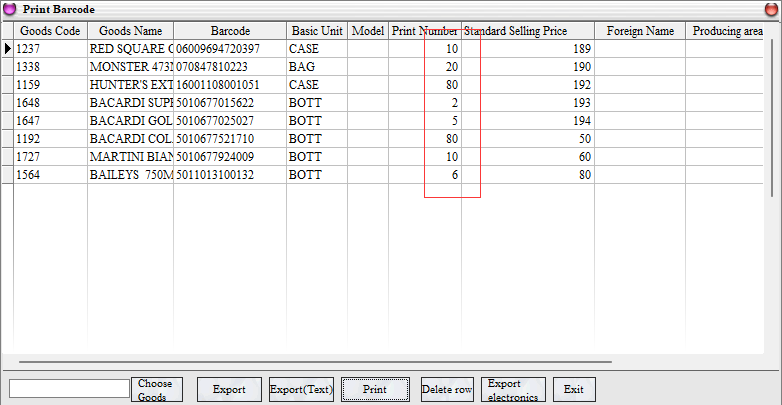
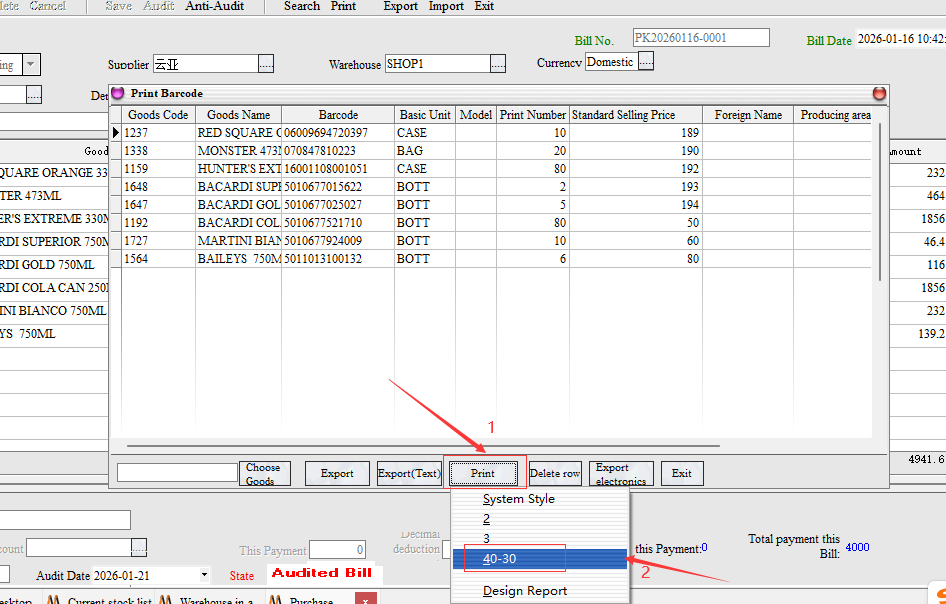
8. Fast tagging #
Operation Steps: purchasing management → purchasing warehousing list → select a blank right-click → bar code printing
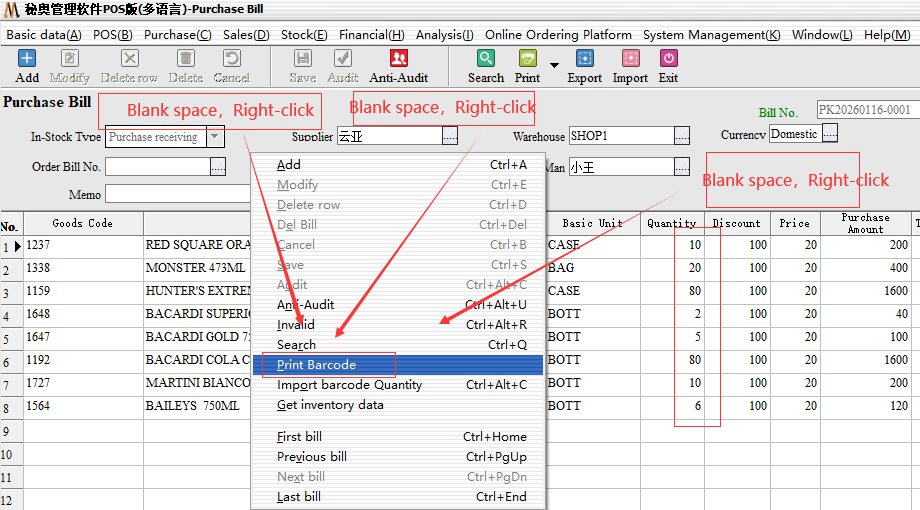
The system will automatically print the corresponding number of labels according to the purchase quantity
Once you click print, selecting the appropriate print template will take you directly to the generated preview screen
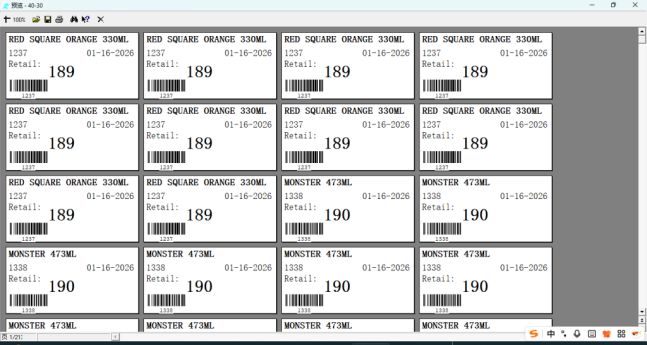
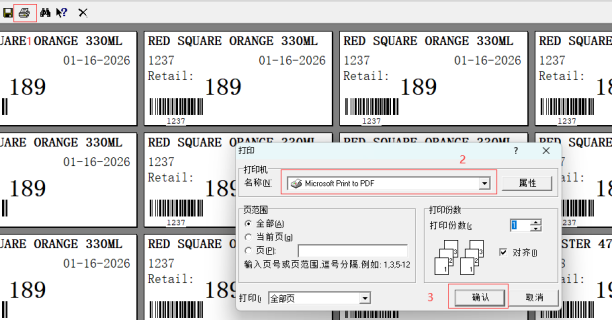
After confirming that the preview template is correct, click on the upper left corner to print the icon, select the corresponding printer, and then print automatically
9. Log in with front-end configuration #
Step 1: Login front desk, you need to background to establish retail information, configure the cash register, create cashier and other related operations
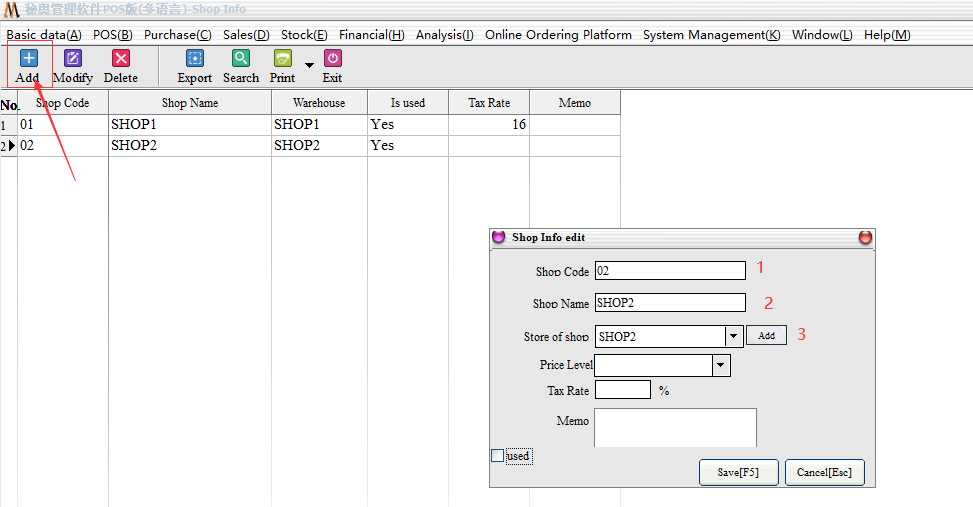
Operation Steps: front office management → retail store information → cash register → Cashier information
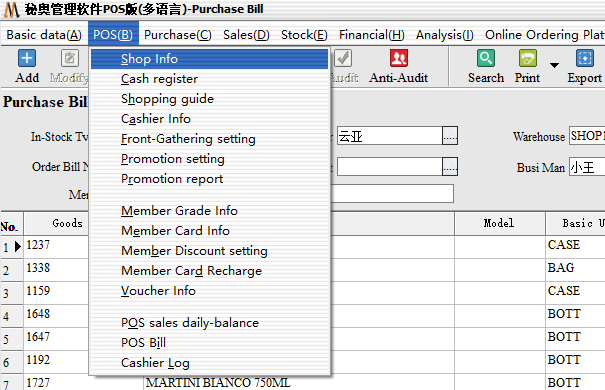
First Click on the new, and then enter the store number, store name, store warehouse, the three must fill in the field, the other can be filled out as needed
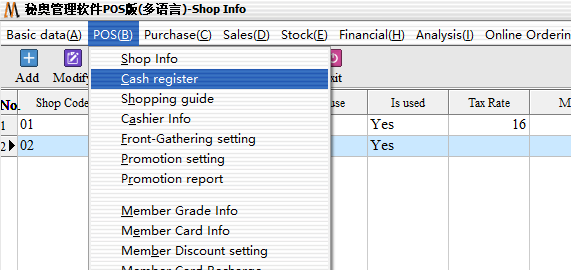
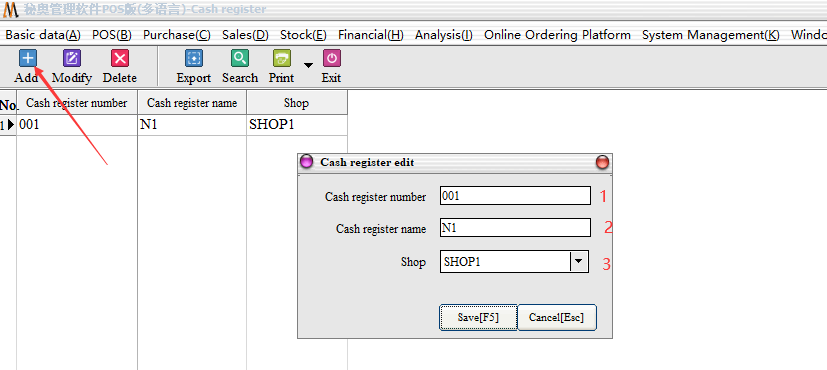
Step 2: Create Cash Register, front desk management → cash register
Click add, enter the cash register number, name, and tie in the retail store
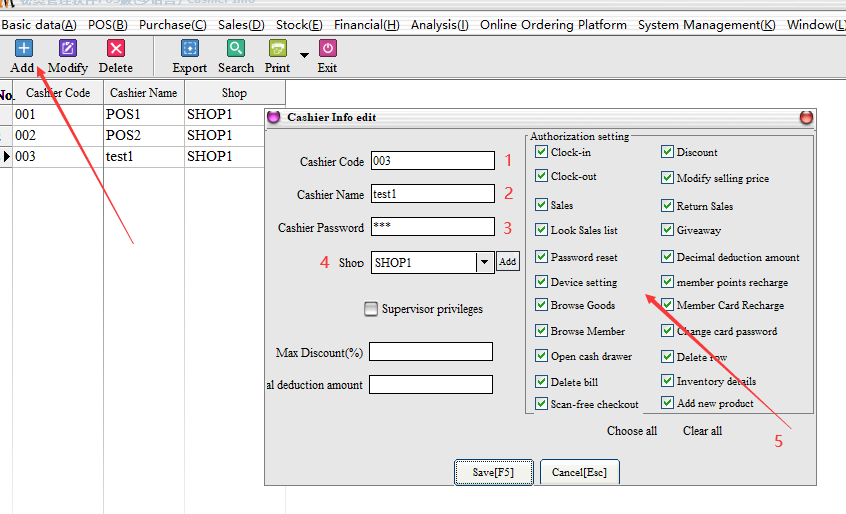
Step 3: create cashier login, front office management → Cashier information
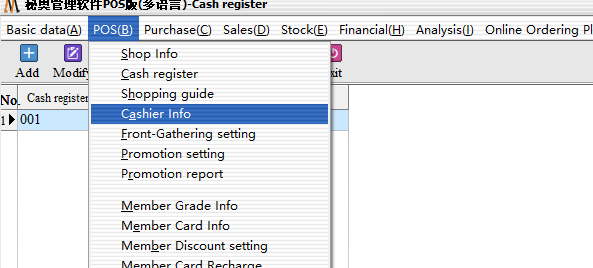
Click add, enter the cashier ID (login the front desk“User name”) , cashier name, cashier password, cashier permission settings (check on that means you can carry out the relevant authority operation, do not check that there is no permission) others can be filled according to the needs.
10. Front desk operations #
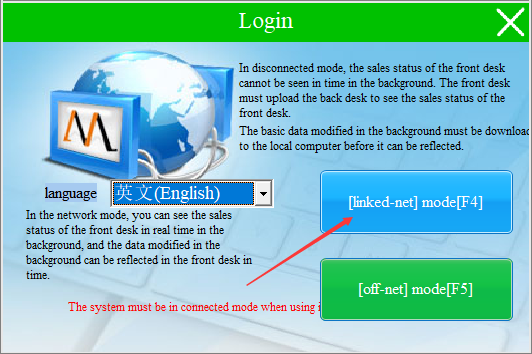
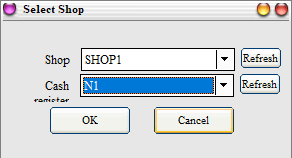
Step 1: configure the front desk login, tie in the retail store, and the cash register
Double-click on the foreground icon, click on the network mode → enter the server name, enter the server password (password defaults to 123) point to determine the login
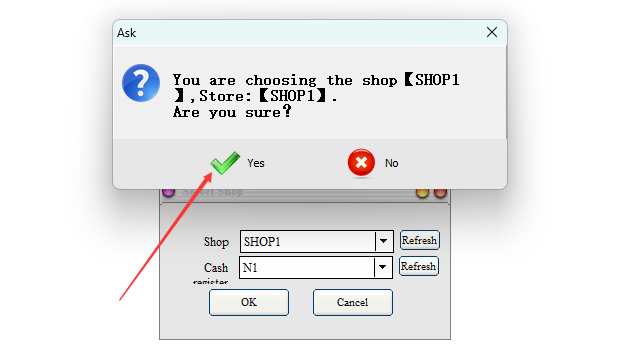
Select the appropriate retail store and cash register, and then click OK
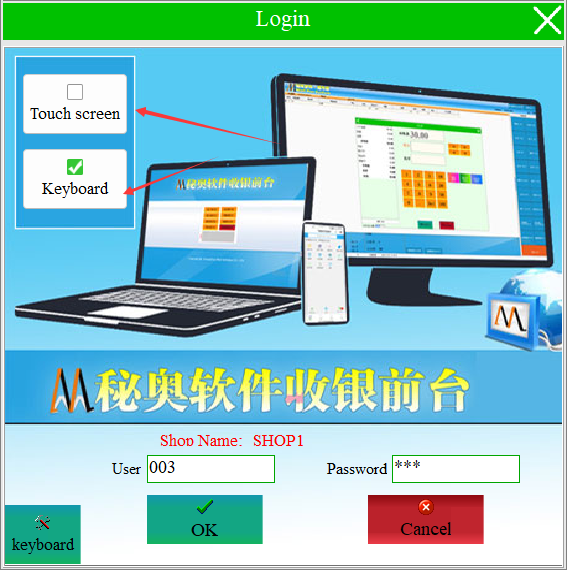
Enter the cashier account and password (Note: the user name is cashier ID) created in the background, you can choose the touch screen mode or keyboard mode according to your computer
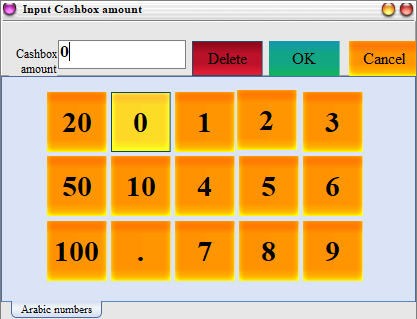
According to their own actual situation to enter the amount of cash box, no 0(note: similar to the total supermarket change)
Step 2: configure foreground parameters, printer, ticket title, welcome message, address, phone number, etc.
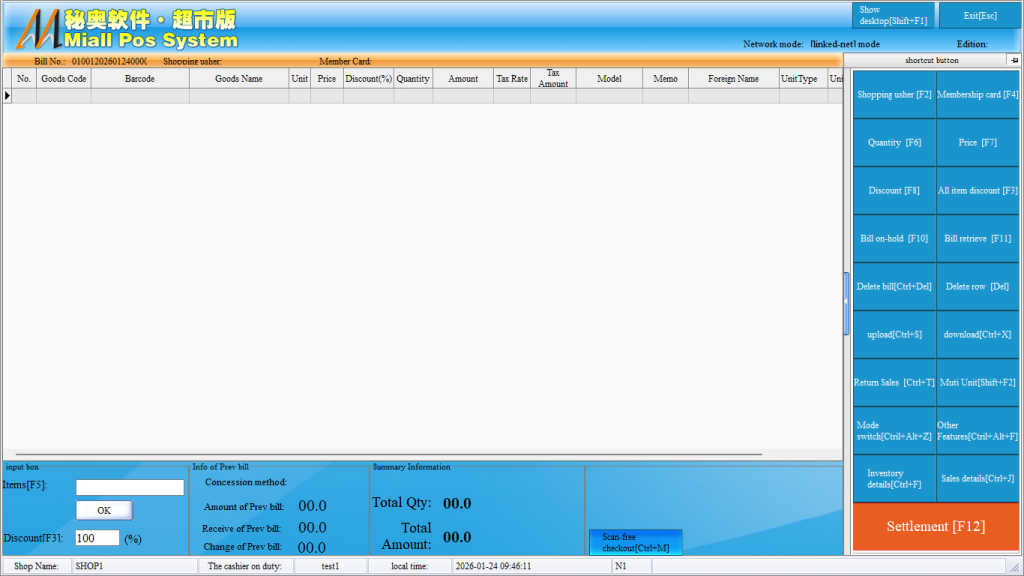
Click on other features
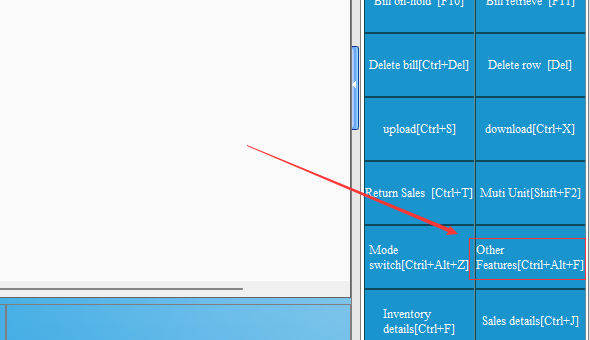
Click on preferences
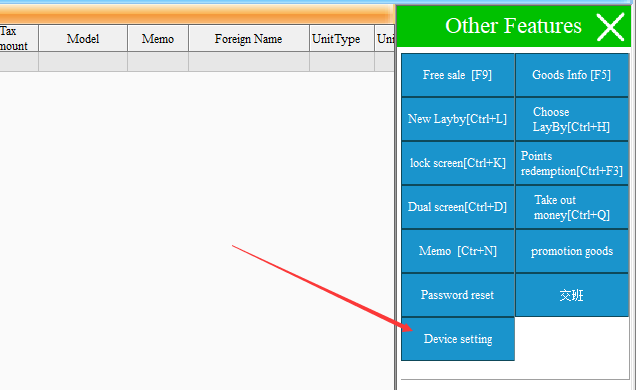
First of all, you need to check whether there is a printer on the connection port to select the corresponding printer driver, print mode must choose a custom print mode. Check the box according to your cash register, and enter the title of the report (the default store name) , the supplementary description (the default welcome) , the footnote (the default address) , and the supplementary footnote (the default phone number) , other can not check.
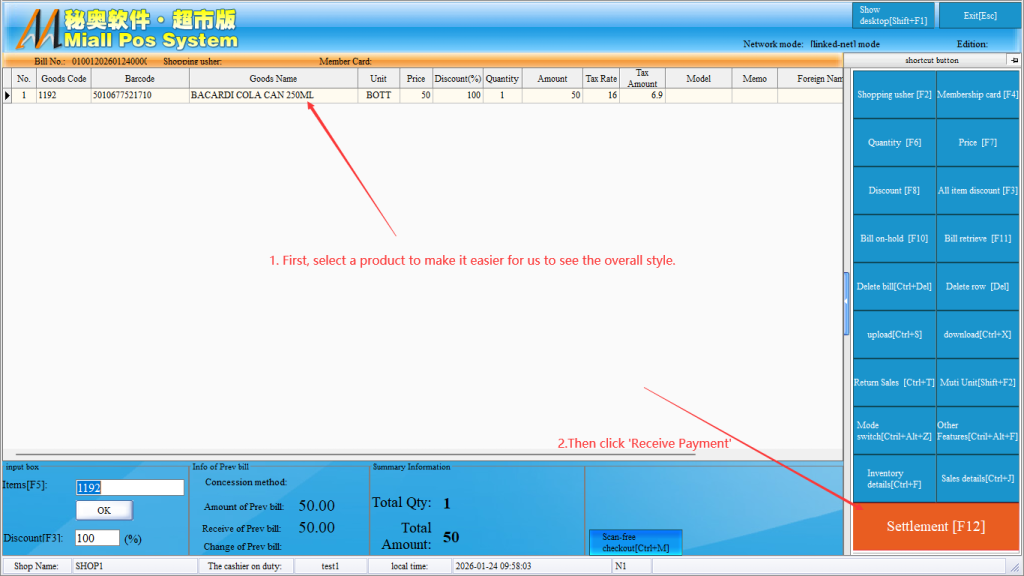
Step 3: After entering the cash register interface, you can normally carry out the cash register. You can directly use the code scanning gun to scan the second number, or directly enter the number to automatically take out the goods, on the right side, you can bind the shopping guide, membership card, unit price (change price) , quantity (modify the quantity) , discount (single discount) , the whole single fold (unified discount of all goods) , hanging list (hang up the order) , take out the single (take out the suspended order) , delete the single (delete a whole single) , delete the line (delete a single product) and other related operations
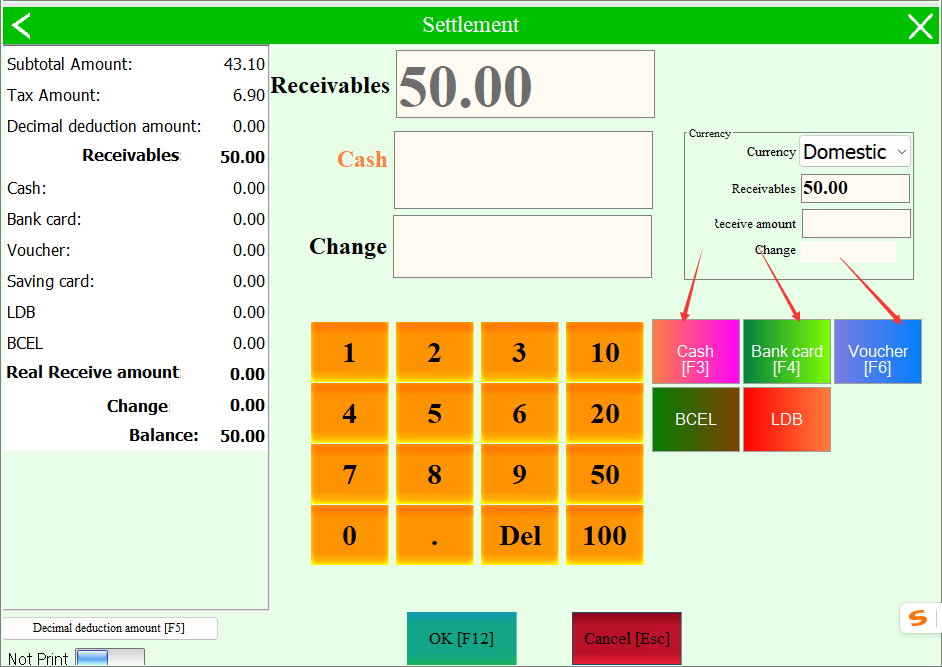
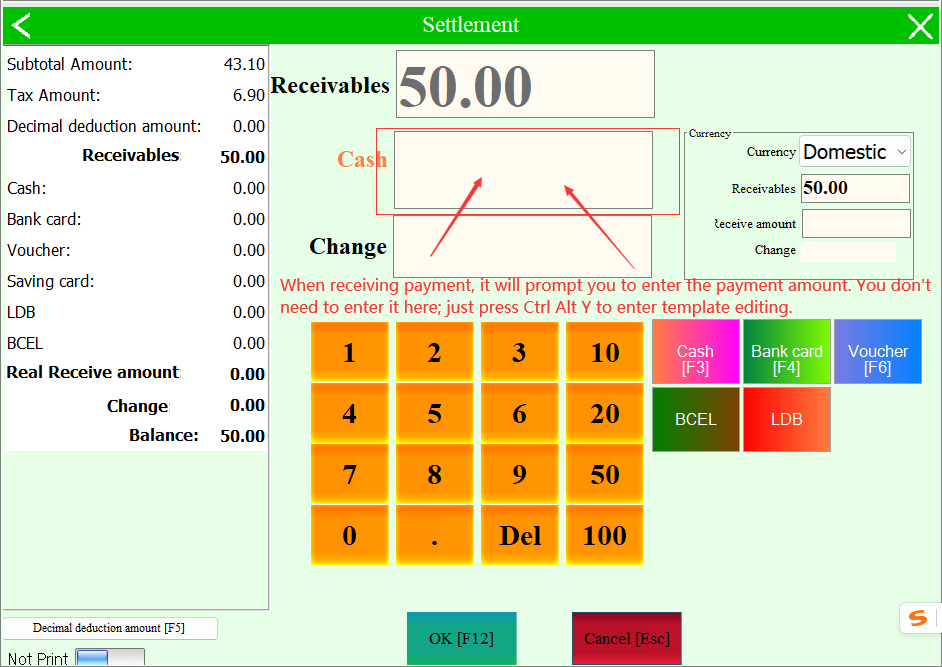
Confirm the customer needs to click on the product information directly after the collection, cash is selected cash collection, bank card is bank card, and so on, automatically print receipts after the collection.
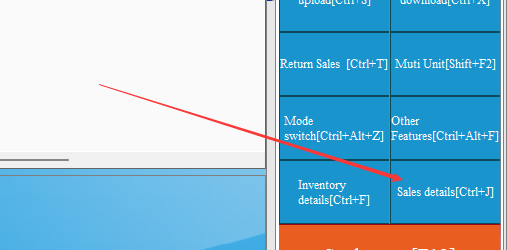
Step 4: need to see what the front desk sold and need to re-print receipts, click on the front desk sales details to see. To see which order to print, select the order and click print.
11. Quick Fix invoices #
The first step: modify the receipt first need to enter the receipt modification interface, if only POS supermarket version, need to point to the collection interface, then hold down Ctrl + Alt + Y key to achieve access to edit the receipt page (it is best to choose a product in advance to see the style)
(note: Clothing version of the direct selection of a product, do not enter the cash register, press Ctrl + Alt + Y can enter the editor)
Step 2: After entering the edit can be modified according to their own needs to modify the content can be directly, double-click after entering the correct content
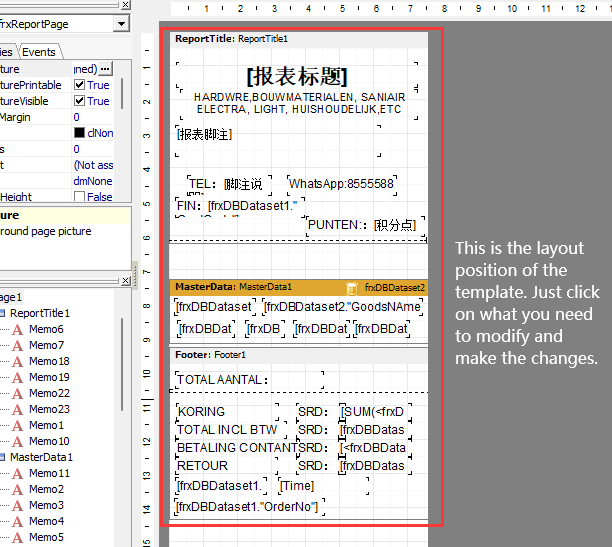
Step 3: after editing and then click save can preview the effect

Close the edit page when there are no problems.
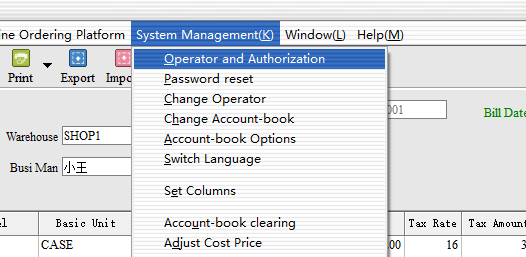
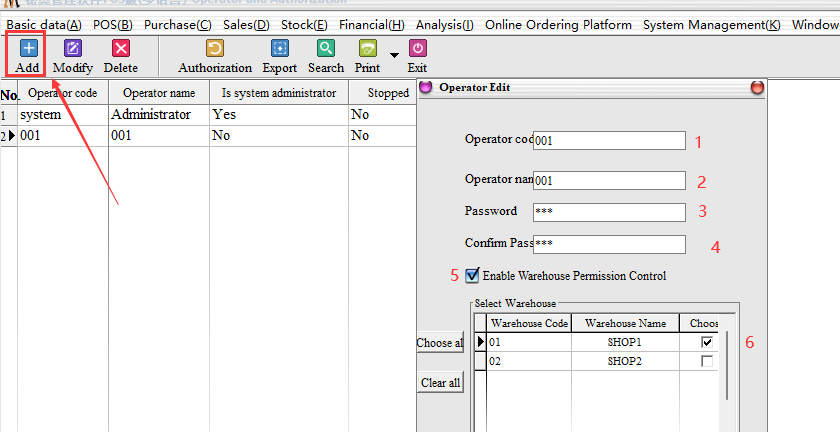
12.Quickly change the password of your back-end employee #
Steps: system administration → Operator and permissions → Change/modify password (it is recommended that only the administrator be allowed to have this permission)
First, after the selection, you can directly modify, and then enter a new password and confirm the password can be

Enable warehouse permissions: If warehouse control permissions are checked, the corresponding operator can only view the data of the selected warehouse and the related invoicing and stockpiling operations. Example: I added a 001 staff, can only Shop1 warehouse operation permissions, the correct check permissions as follows: (Note: Do not enable warehouse control permissions default can view all operations of the warehouse)
13. Quickly set up employee permissions #
Steps: system administration → operator and permissions → permissions
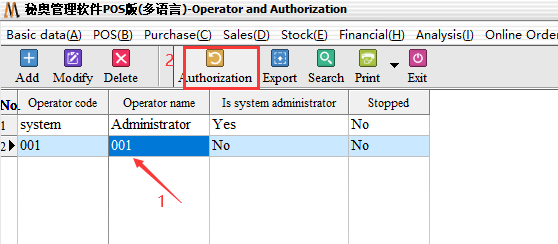
After entering the permissions, the first choice needs to click-authorization-and then do the side of-system module group-click, and then according to the corresponding permissions to check on the line, check the left part of the module name, the right side is the operation permission, remember need to check on can.
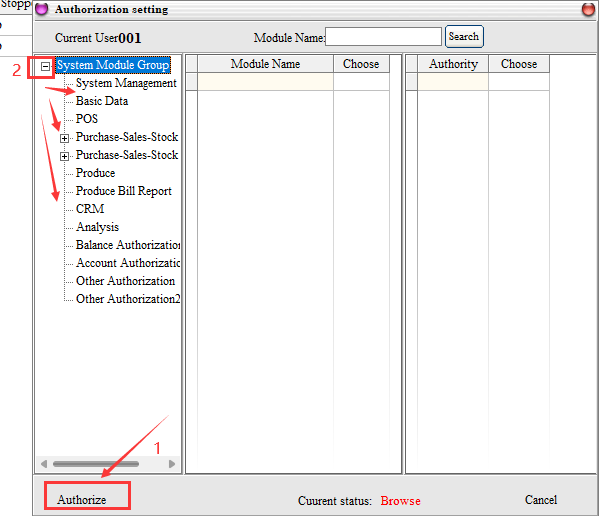
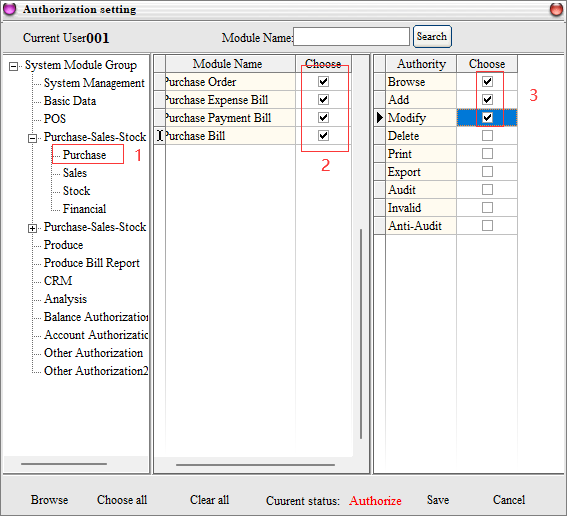
The main authorization for the first click-system module group-then select the module name-then select the permission name, the three at the same time, the module name and permission name at the same time check, to be a complete authorization, as shown in the following figure:
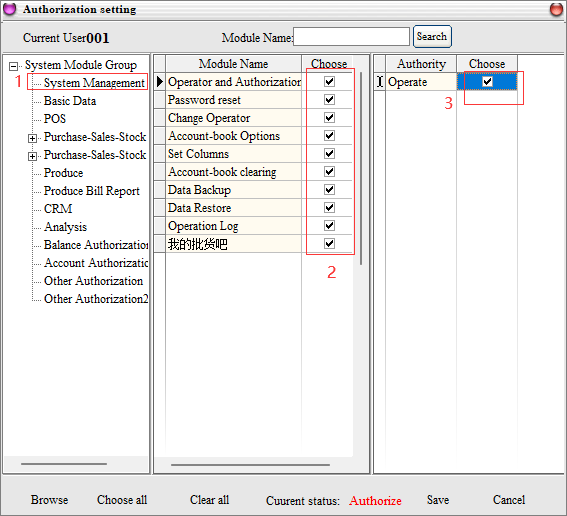
Example: 001 Operator, in the inventory module of the purchase management, all orders, can only view, add and modify permissions, other permissions are not available, the corresponding permissions set as follows: (others and so on)
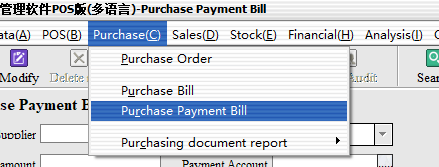
14. Advance payment, installment payment #
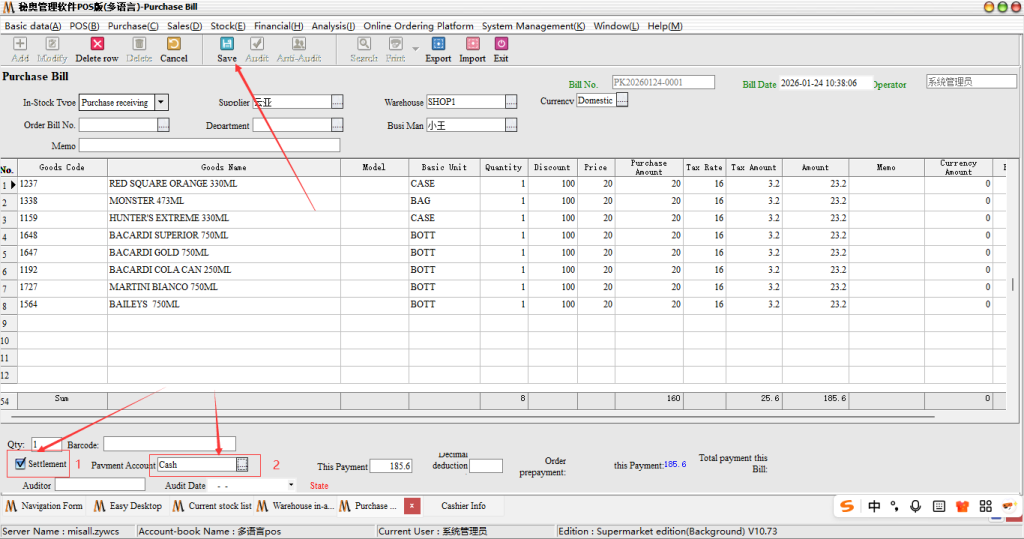
Steps: first of all, the software in the purchase payment list is to support the development of storage order when the direct collection of money, just in the time of issuing bills to check the money can be, as shown below:
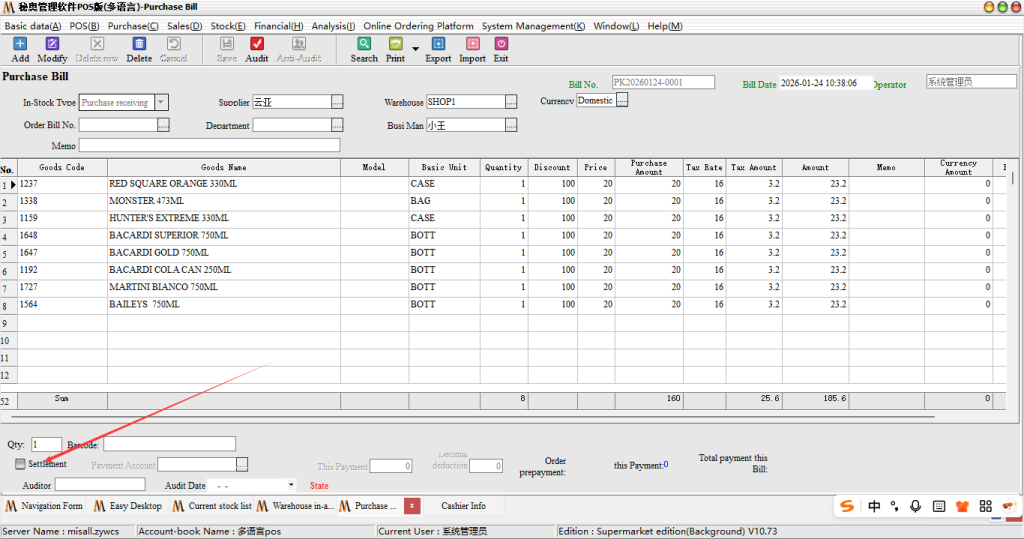
Secondly, if there is no payment this time and choose the next payment or payment by instalments, then we in the purchase inventory list, do not check payment, directly save the documents can.
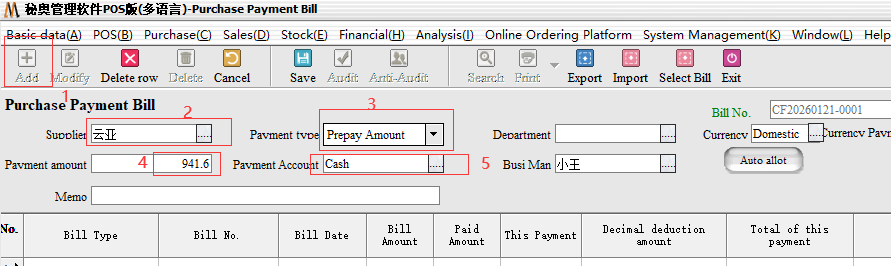
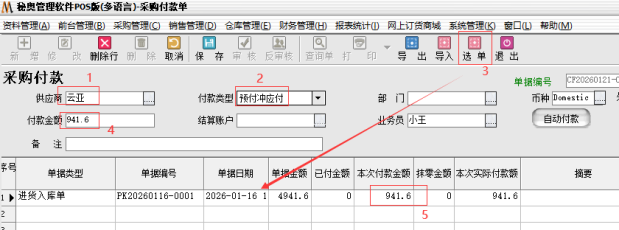
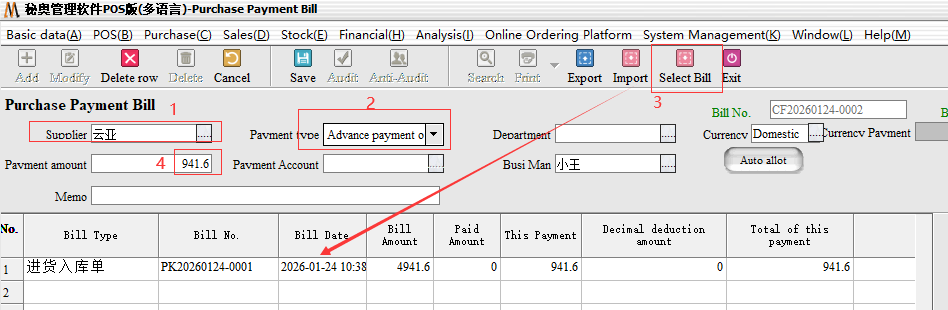
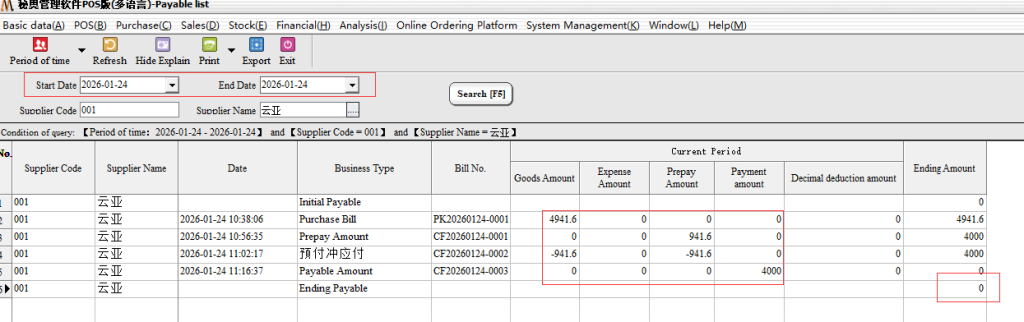
Step 1: We Go directly to the purchase payment, the first choice of the corresponding supplier, and then directly click on the quotation, select the corresponding order after payment. (example: this advance 941.6 yuan)
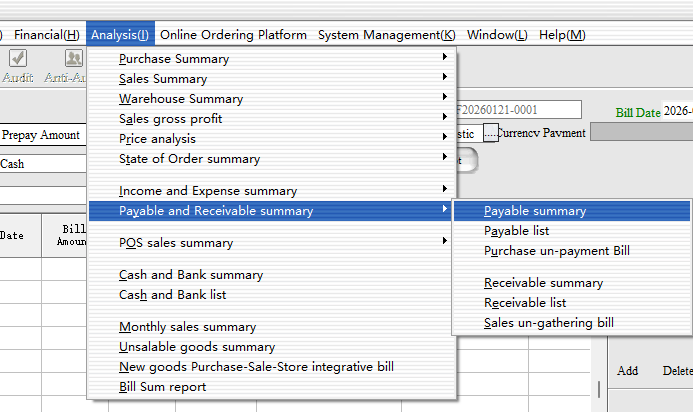
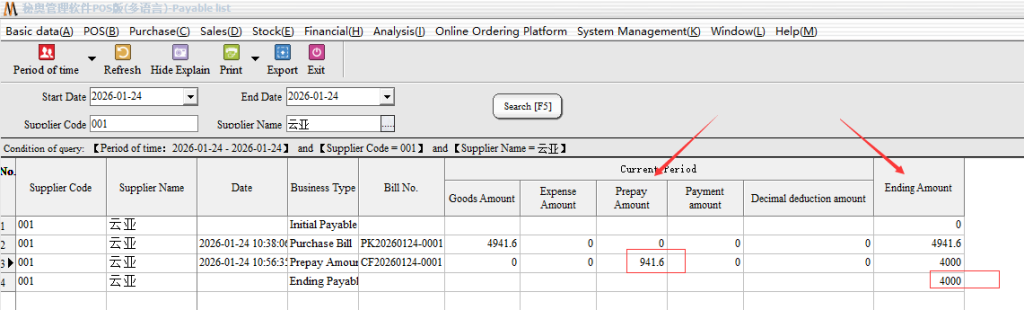
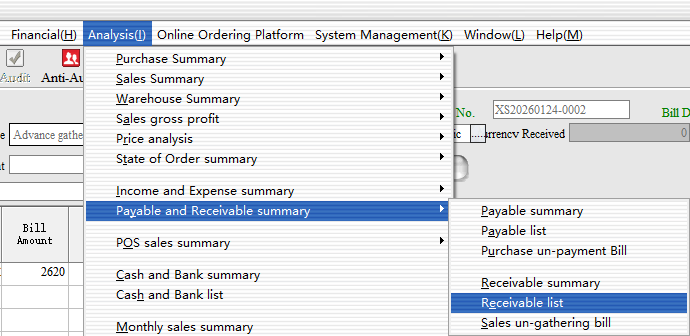
According to the above order can see we only paid part of the amount, need to view the remaining amount can be to, report statistics → Accounts Receivable, accounts payable statistics → accounts payable summary view
As you can see, our prepayments have been recorded, but the total amount has not been reduced and needs to be written off.
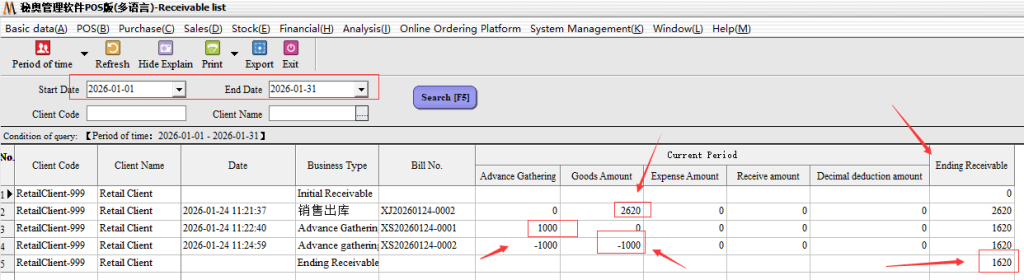
Step 2: GO to the purchase payment note, the purchase payment note for“Prepaid charge payable”, select the corresponding supplier, enter the amount received in advance (941.6) , and then click on the quotation, the single charge. At the same time in the document details, enter the amount of this payment (with the supplier under the payment amount to be consistent) .
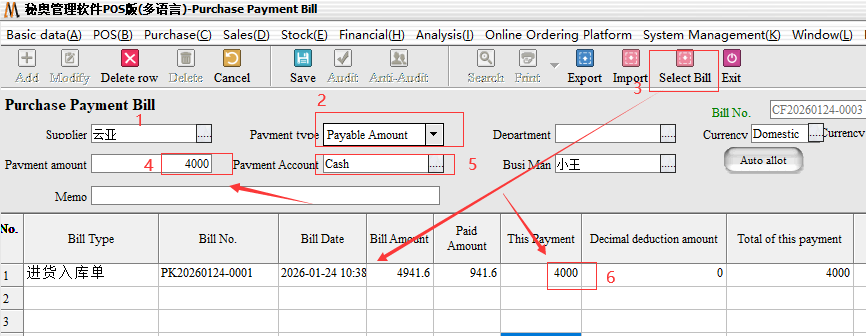
Step 3: the second end of the payment, we came to the purchase bill inside, select the corresponding supplier after we directly choose the payment type for“Payable”, can be a collection. The system will default to the amount we have paid
The rest of the direct input of the remaining amount of payment can be.
15. Prepayments and installments #
Steps: first of all, direct collection, in the time of issuing bills to check the settlement, as shown below:
The first step of pre-payment: directly to the receipt below, the first choice of the corresponding customer, and then directly click on the quotation, select the corresponding order after the collection. (example: this advance 1000 yuan)
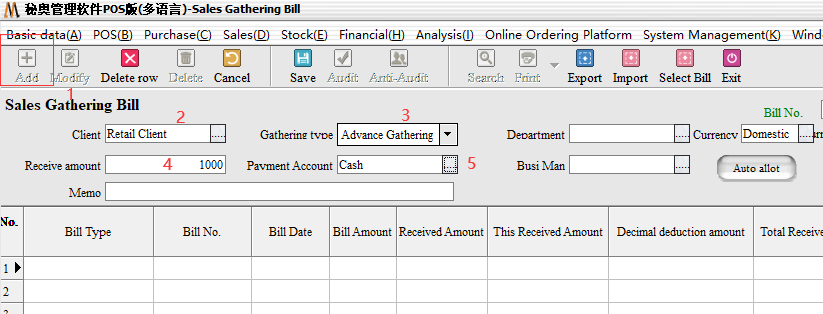
Step 2 pre-charge receivables:
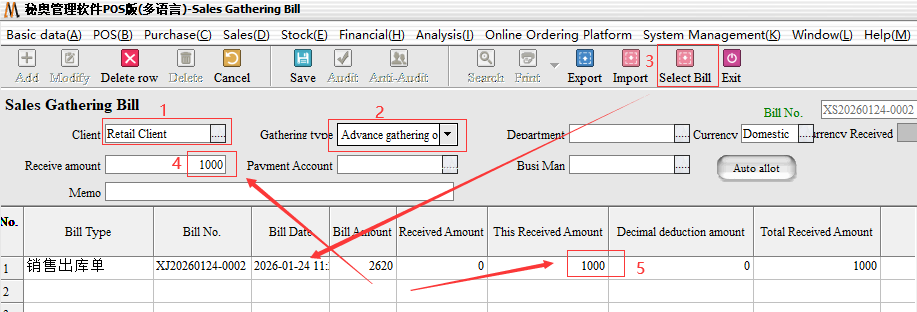
After the appeal operation can complete the first partial collection, you can carry out customer arrears data view, statement statistics → Accounts Receivable, accounts payable statistics → Accounts receivable list
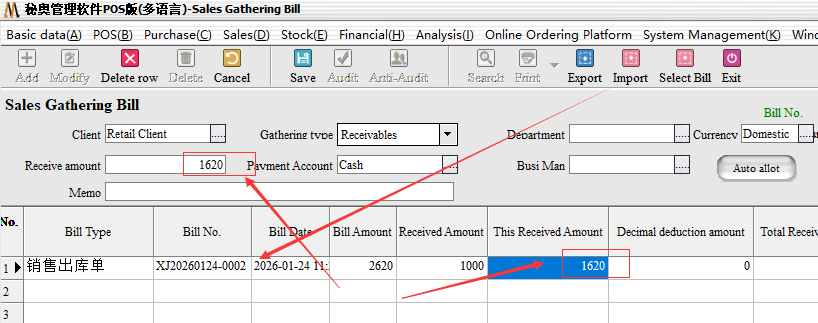
The second end of the paragraph: direct selection of customers, enter the final payment for collection.
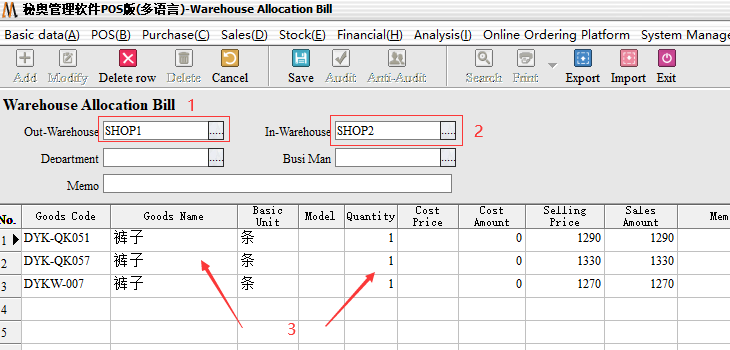
16. Quick transfer #
Steps: Warehouse Management → Warehouse transfer order
The first step: first select the transfer out of the warehouse, then select the transfer into the warehouse, the following input need to allocate the commodity information and quantity can be allocated by default is the cost price. (note: At the same time the quantity can also use Excel table import method with the same Excel method)
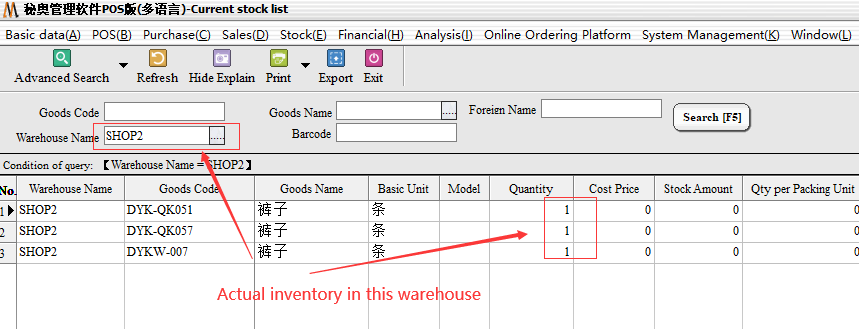
Step 2: After the transfer, you need to view the inventory separately, in the warehouse management → inventory details → Warehouse Shop2(demo warehouse) . The total amount of goods in stock remains the same, but the specific warehouse will show the actual inventory.
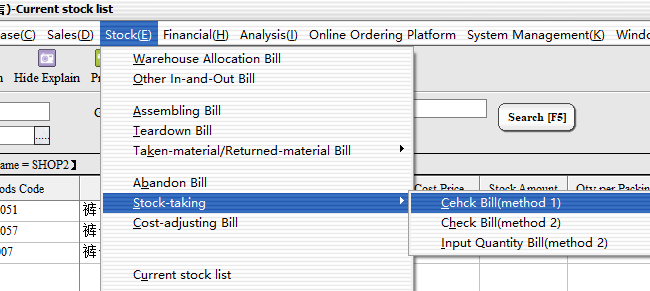
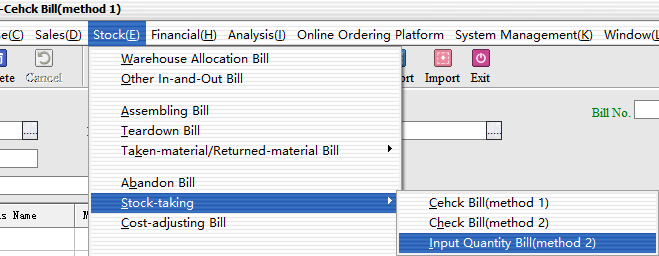
17. Quick count #
Step: Warehouse Management → Inventory Management → Inventory list (Method 1)(general default use method 1, can choose according to demand)
The first step: inventory method: directly select the corresponding warehouse, the following selection inventory goods after the input inventory quantity inventory can be.
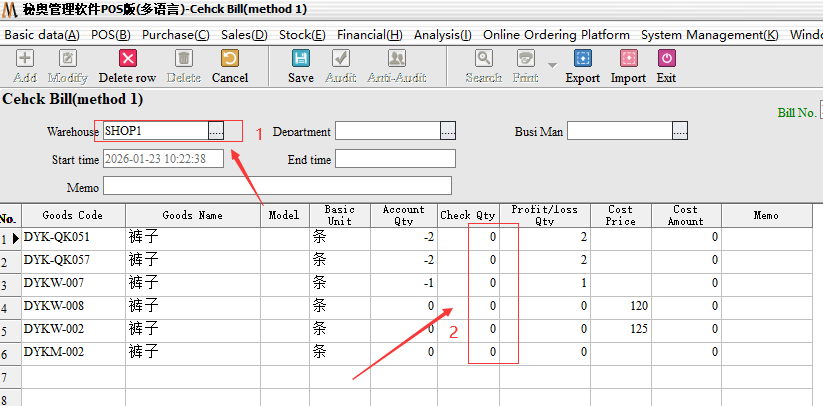
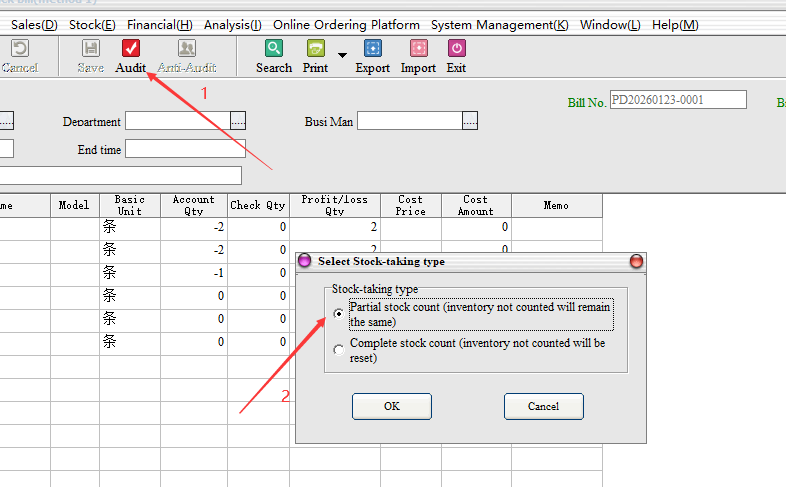
Step 2: Audit, after the audit need to choose the inventory method. Partial inventory: Only the selected part of other inventory remains unchanged; Full Inventory: for the Month/year store inventory, not selected goods, the default empty inventory.
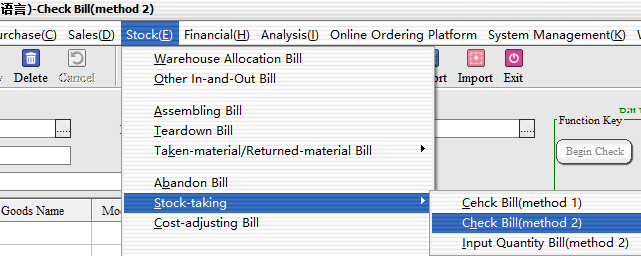
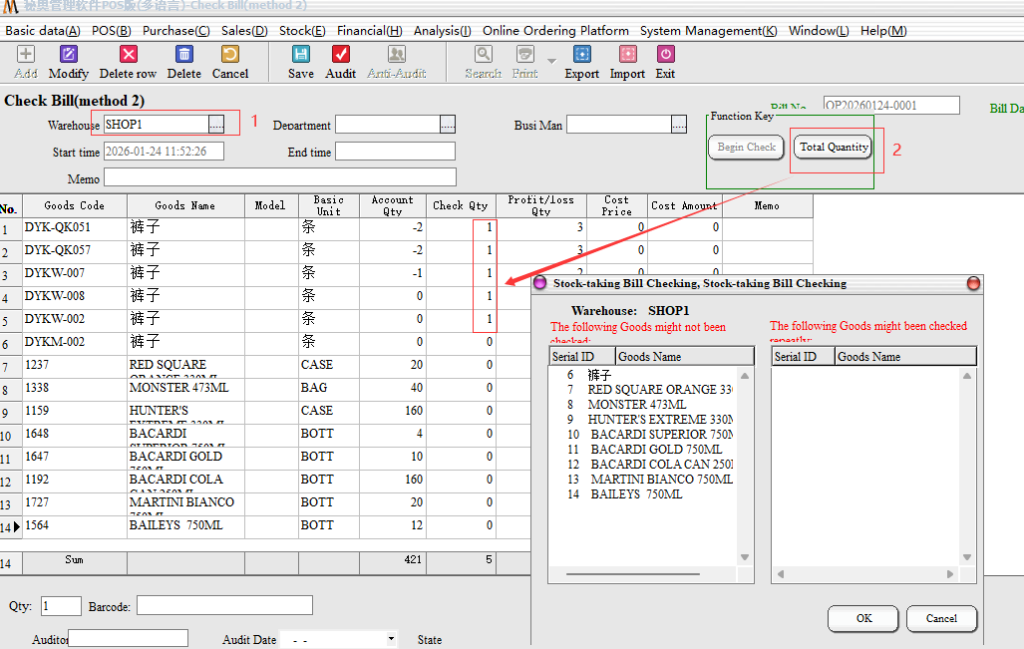
Inventory list (Method 2) : mainly for multi-person inventory, different employees operate the same inventory documents, followed by a summary.
First Step: first want to first create an inventory list, and then directly click on the“Start Inventory”, waiting for the information automatically brought out after saving, no review.
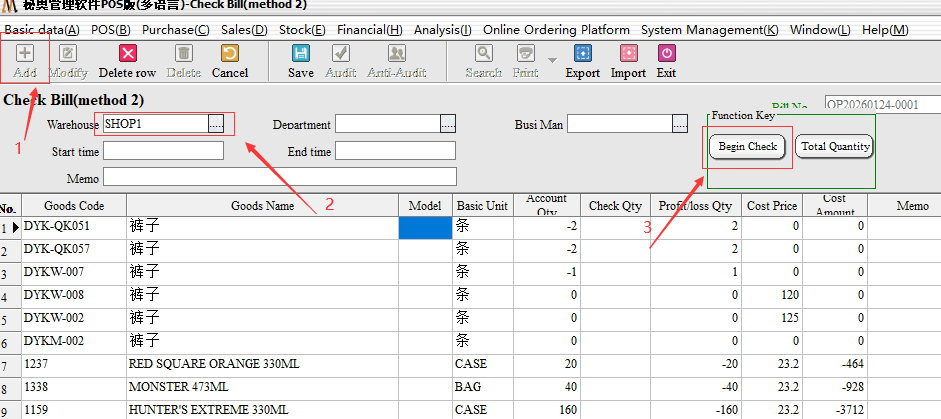
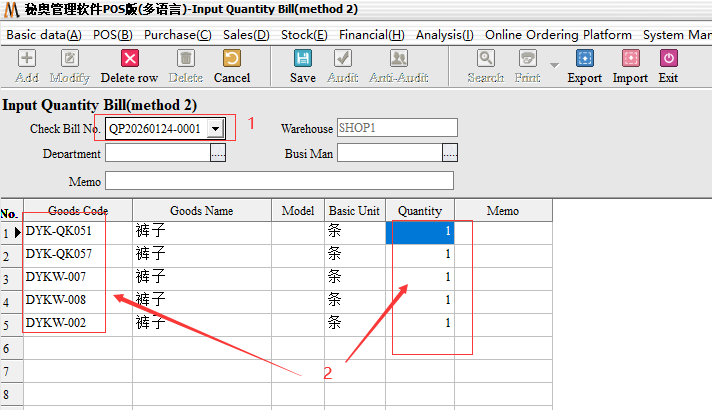
The Second Step: to the inventory of the number of entries, select the corresponding inventory list number, and then select the corresponding warehouse, then enter the goods after the audit can be saved.
Example: I this employee, only inventory of the first five items
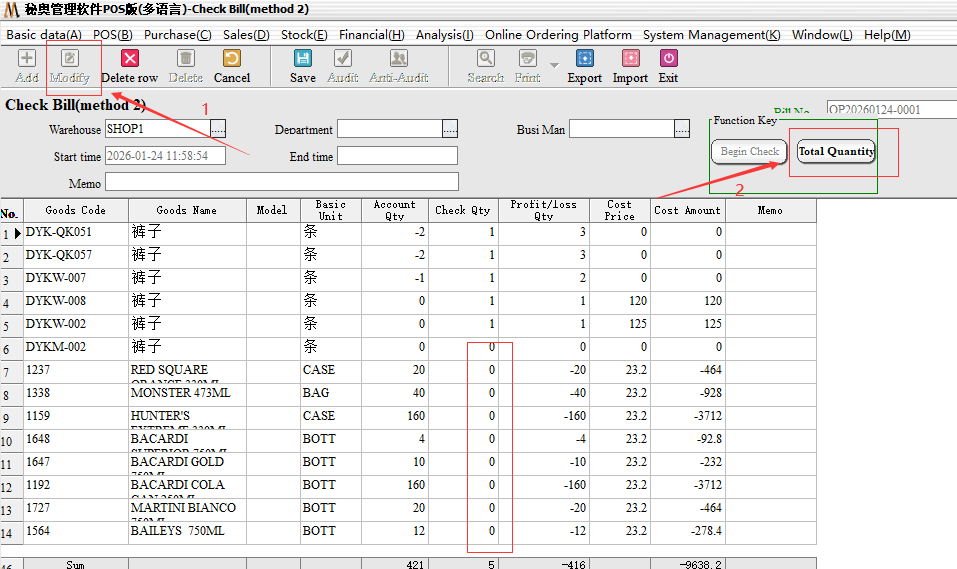
Save after the audit, to the inventory method two, query the original order, click to modify, and then click on the total inventory can be.
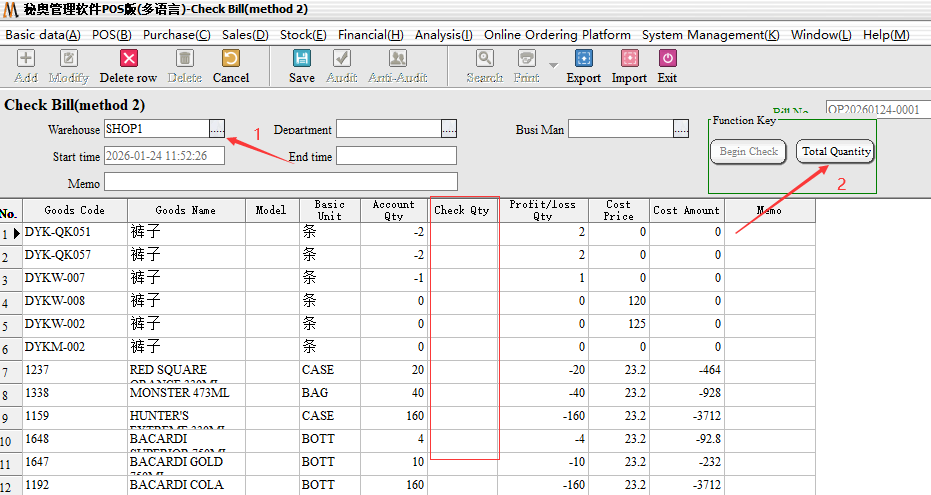
You can see will automatically summary just staff Wang, inventory of the first five goods inventory.
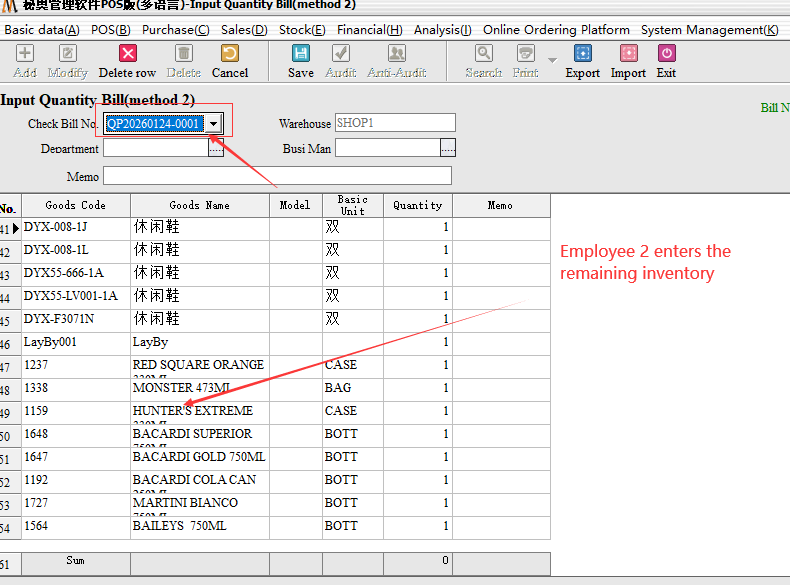
Example: Now we need a small piece of inventory of the remaining goods, as follows:
Add a new entry form, select the original method two orders, input the remaining inventory quantity of goods
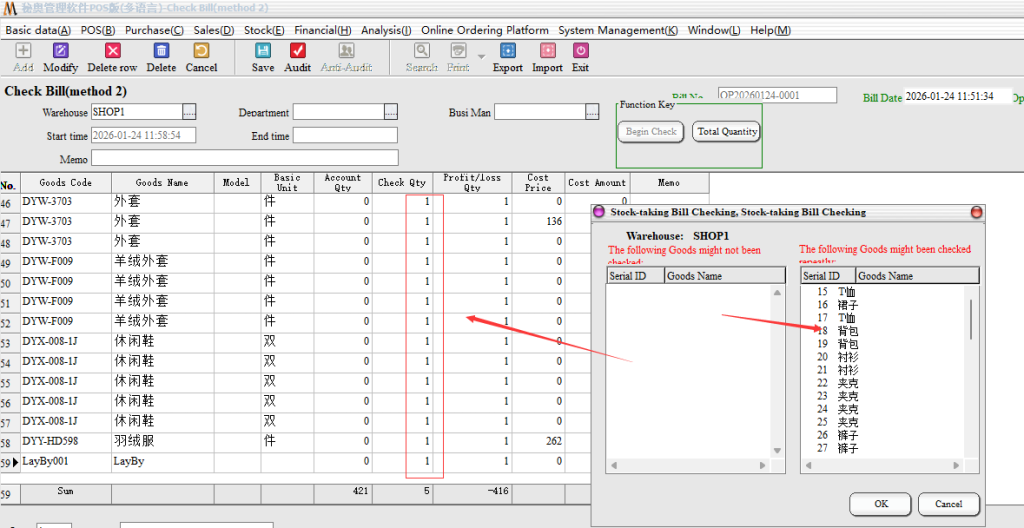
Click on the summary will be directly out of the two orders all the summary of goods, after confirmation can be audited.
Notes:
Inventory Method One: a document for a person to carry out direct inventory, can only generate a document.
Inventory method two: for a number of employees, generate a number of documents for inventory after the summary, you can see the corresponding inventory of different employees.